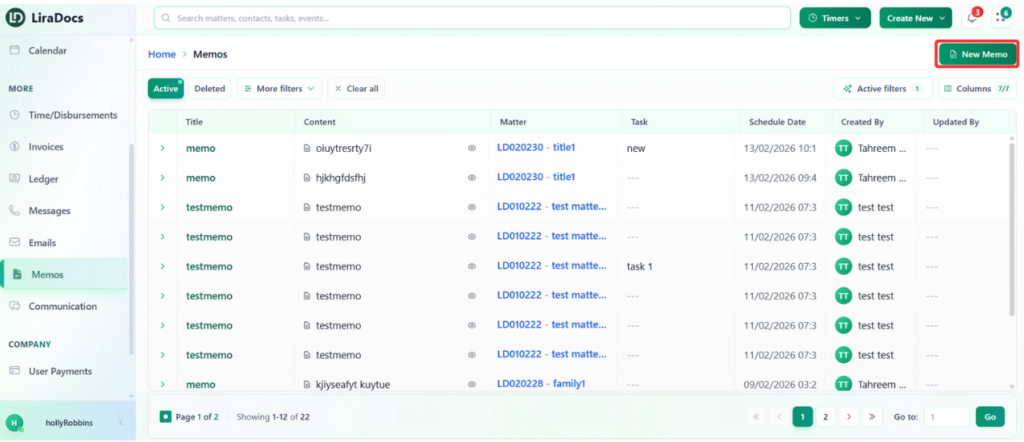
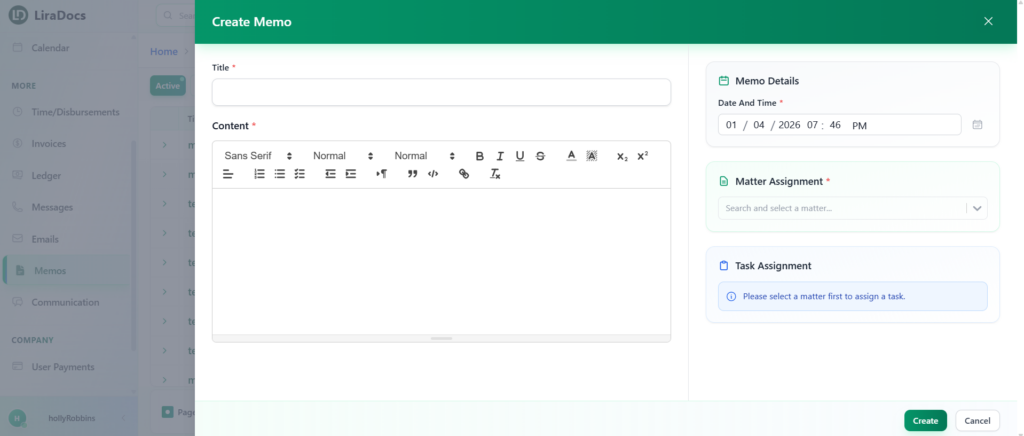
How to Create a Memo
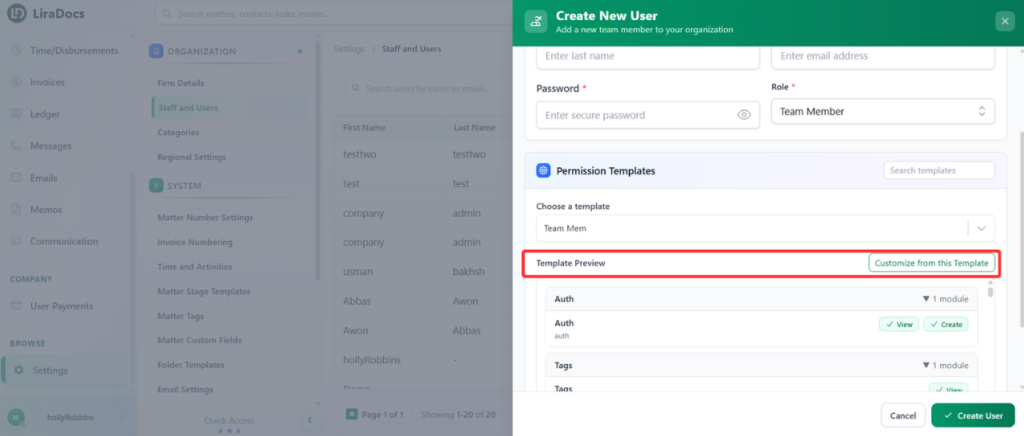
How to Create a New User
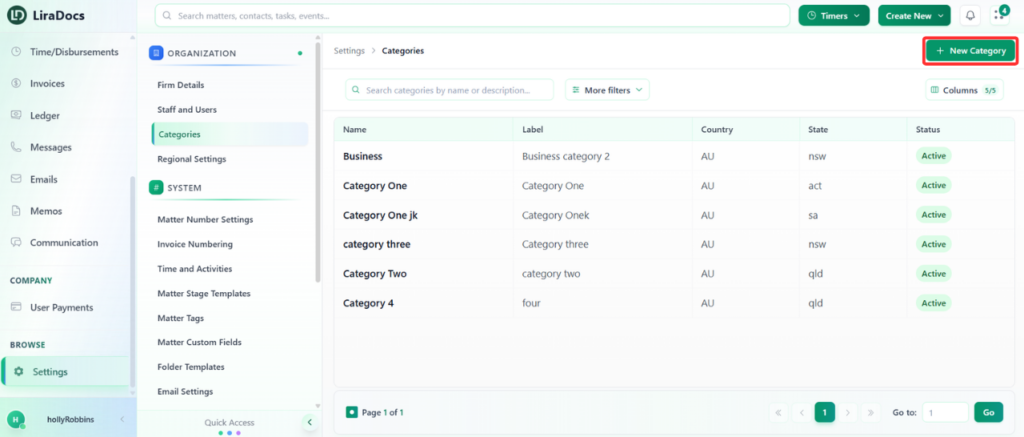
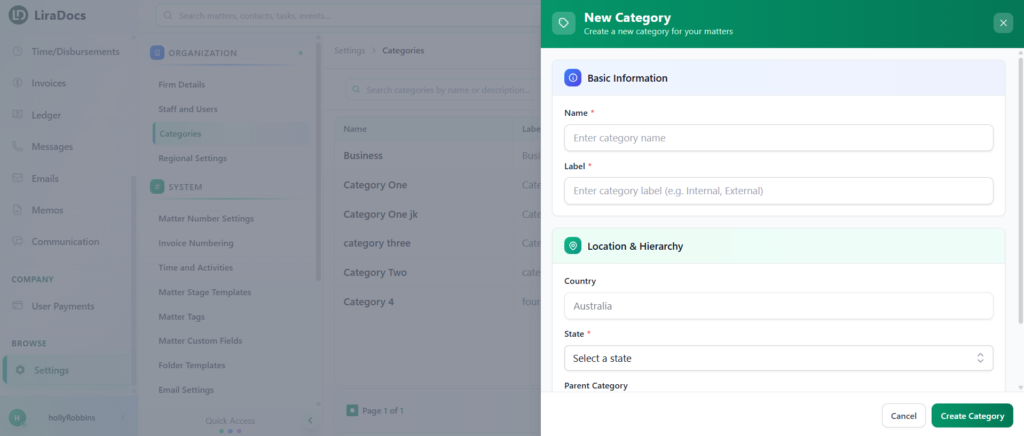
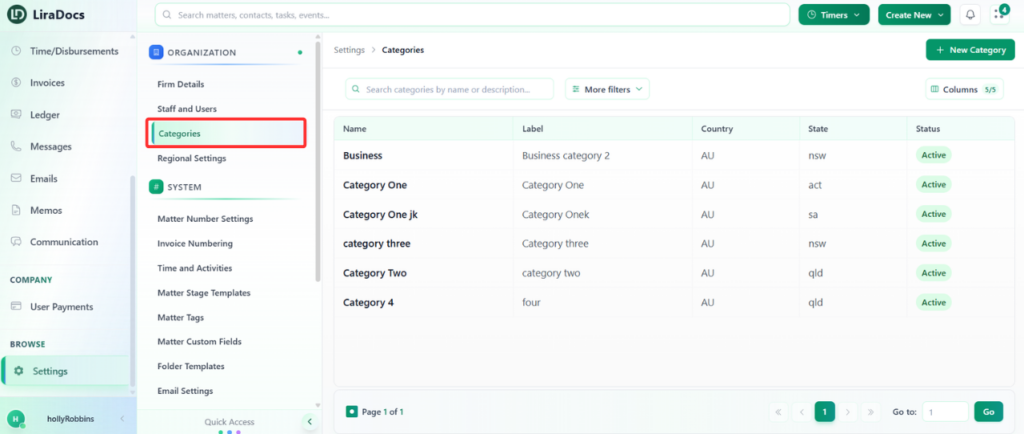
How to Create a Matter Category
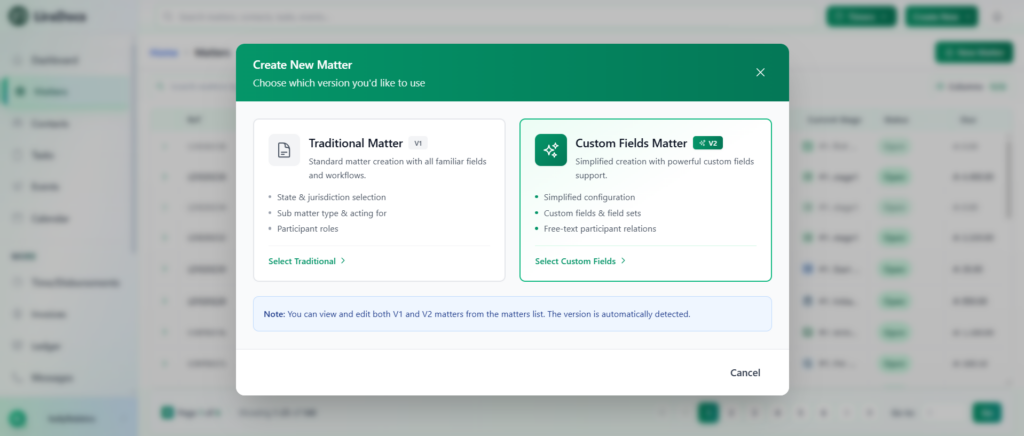
Matters
How to Create a Matter in Liradocs Mobile App
How to Reinstate a Deleted Matter in Liradocs Mobile App
How to Create a Matter in Liradocs Mobile App
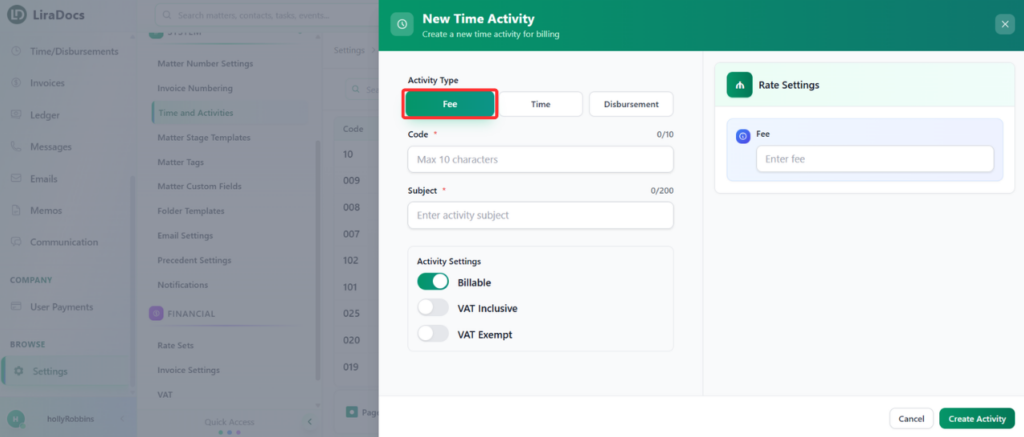
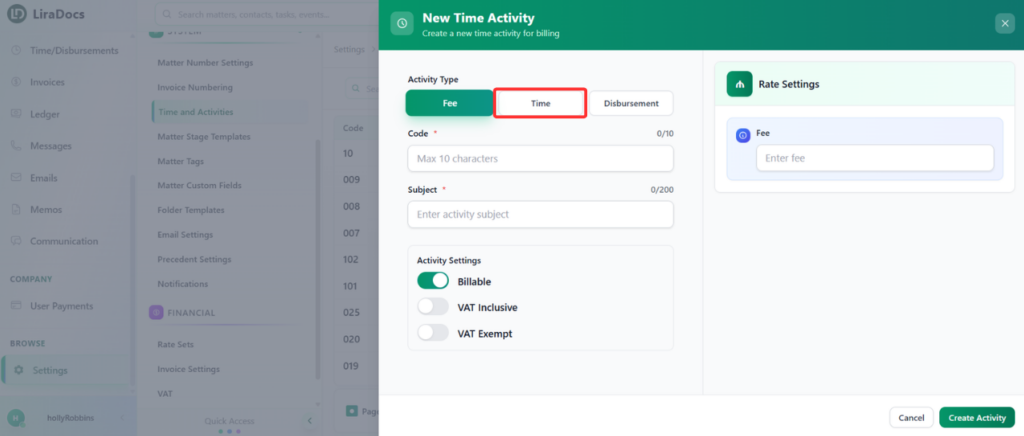
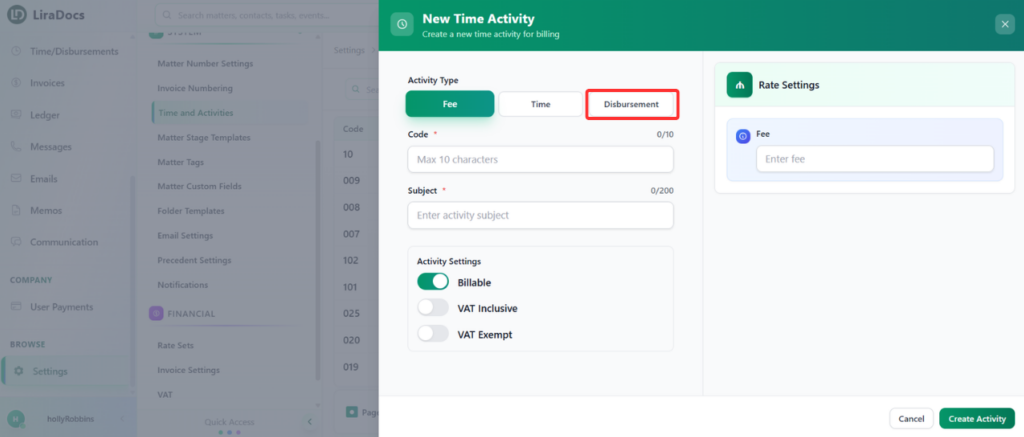
How to Create a Time Fee Activity
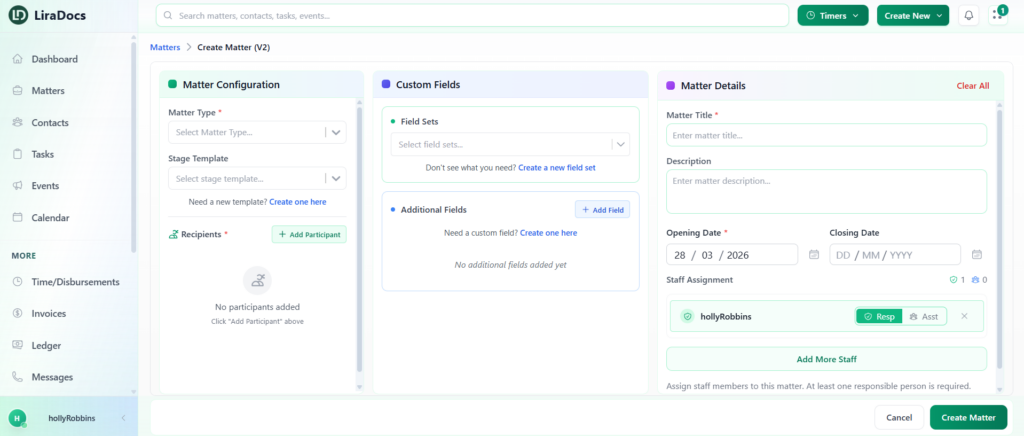
How To Create A Matter
How to Create an Individual Contact in Liradocs Mobile App
How to Create an Event in Liradocs Mobile App
How to Create a Task in Liradocs Mobile App
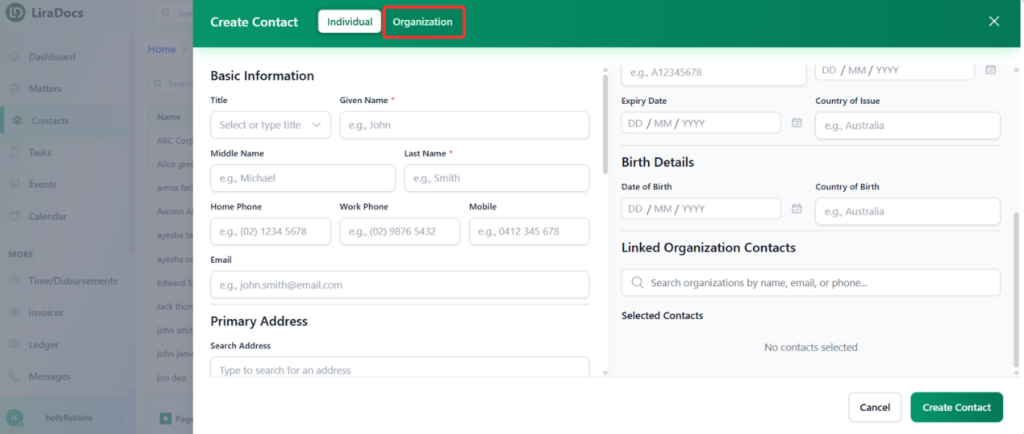
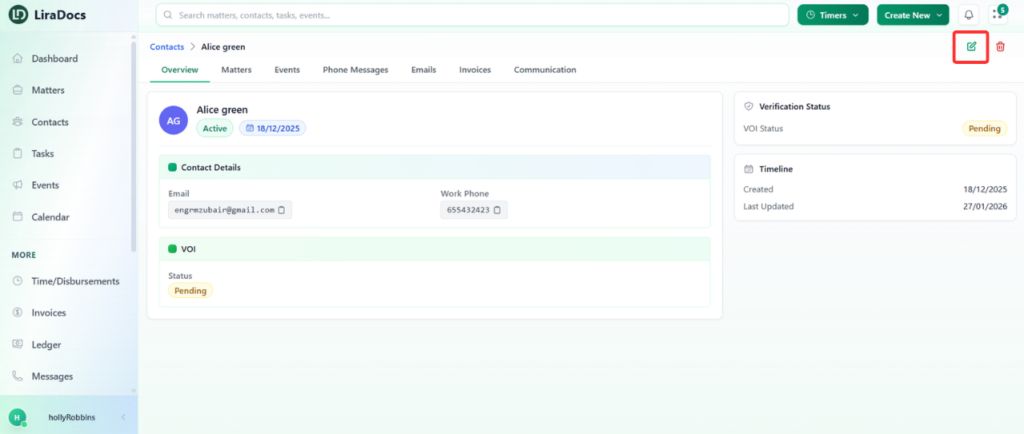
How to Create an Individual Contact
How to Create a New Phone Message in Liradocs Mobile App
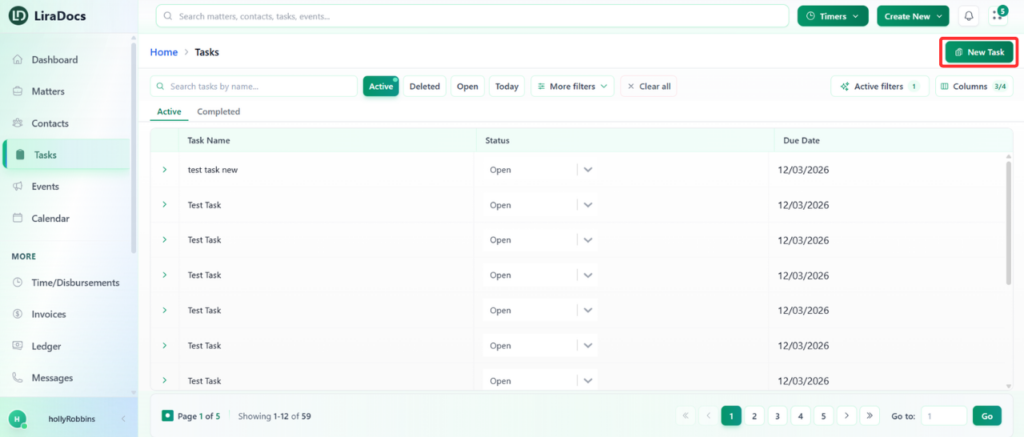
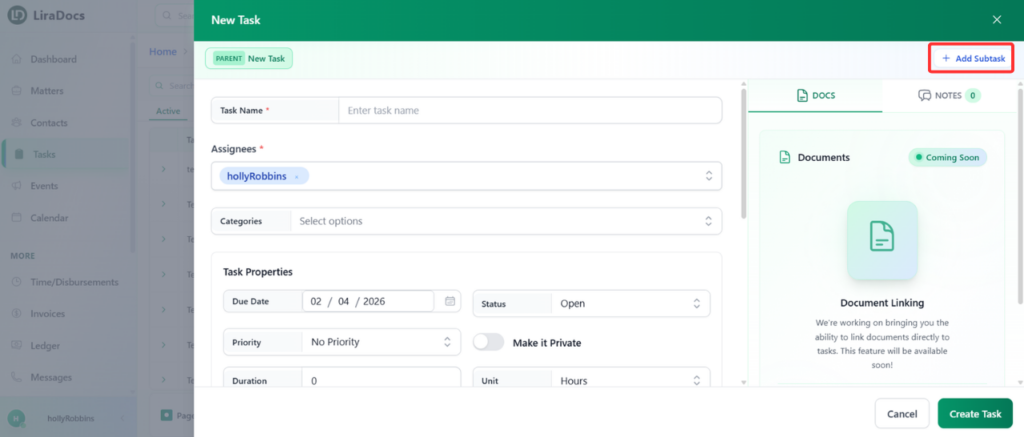
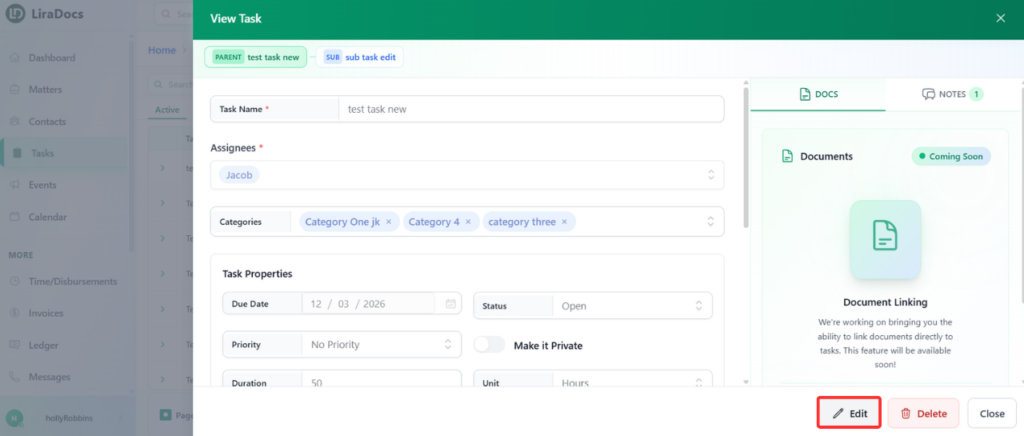
How to Create a Task
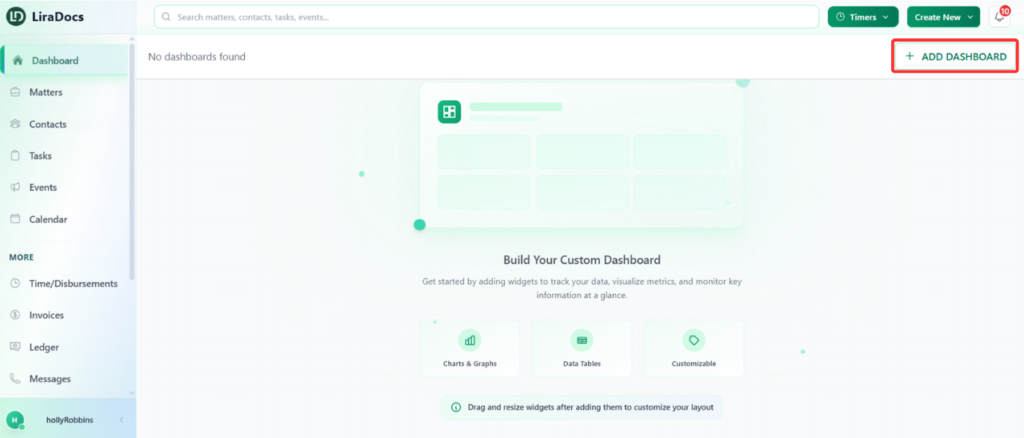
Dashboard
Dashboard – Complete Guide
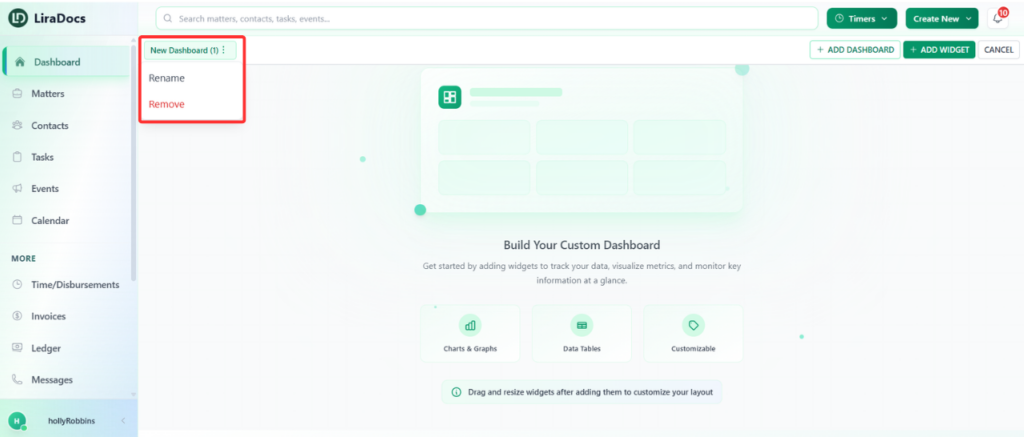
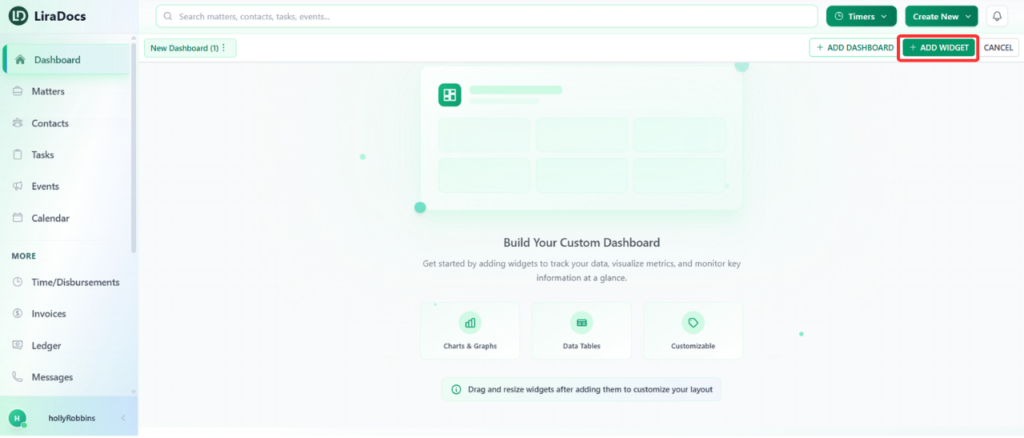
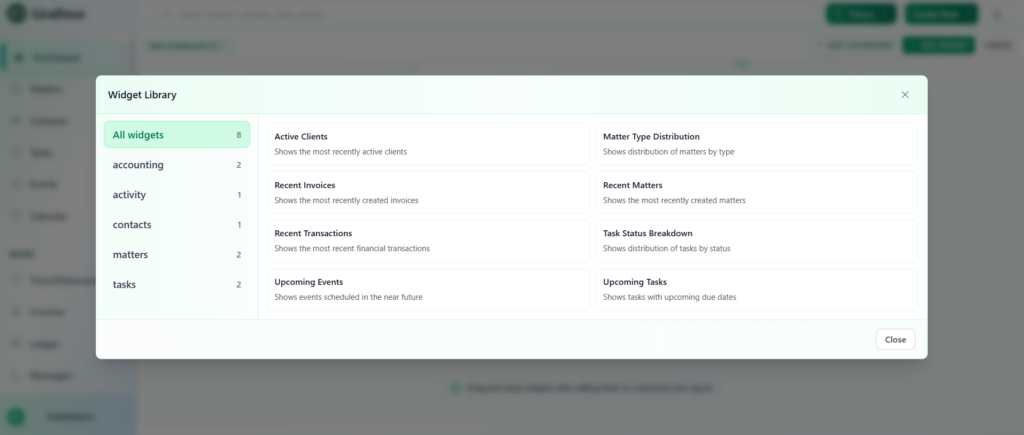
Adding and Customizing Widgets
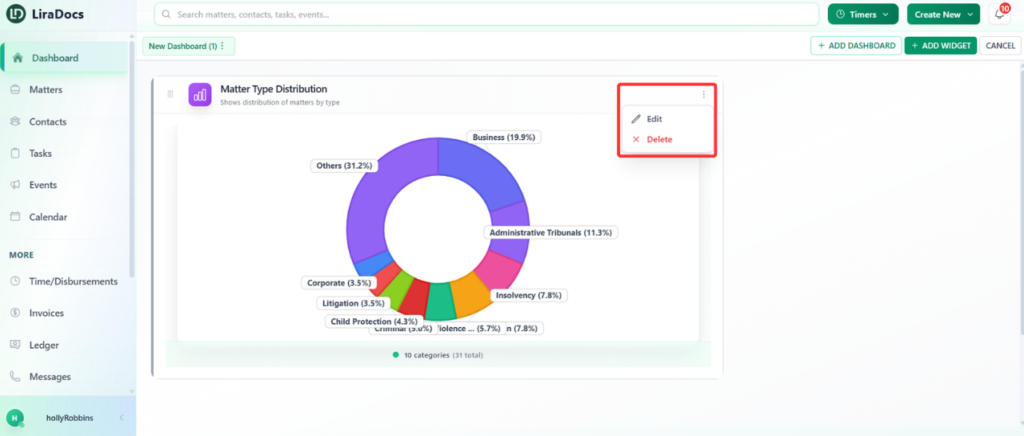
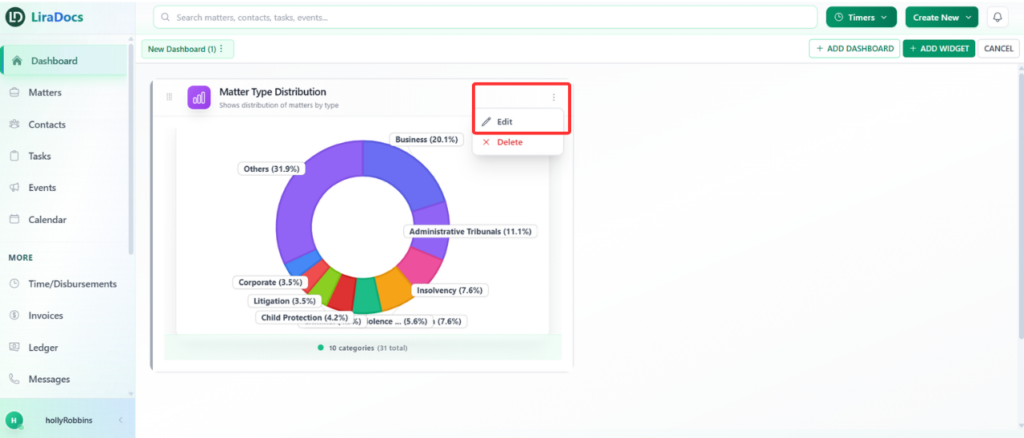
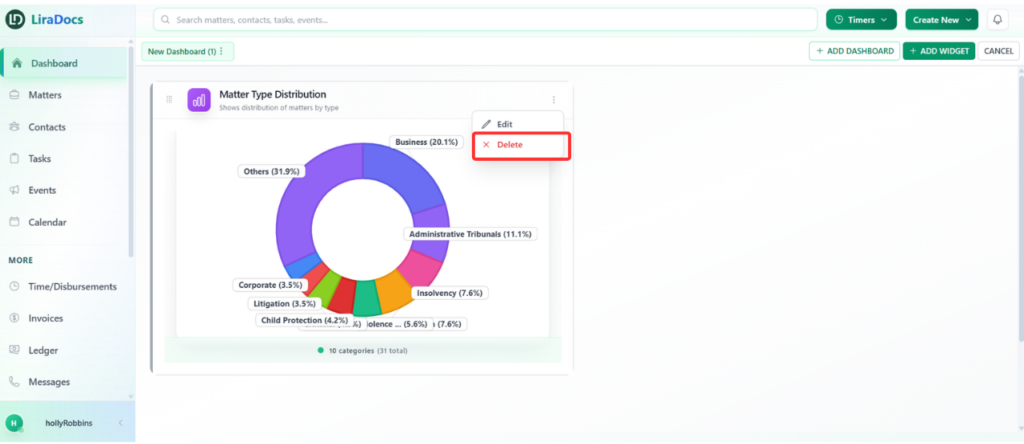
Editing or Deleting a Widget
How to Add a New Widget to the Dashboard
How to Edit a Dashboard Widget
How to Delete a Dashboard Widget
Dashboard – Complete Guide
Adding and Customizing Widgets
Editing or Deleting a Widget
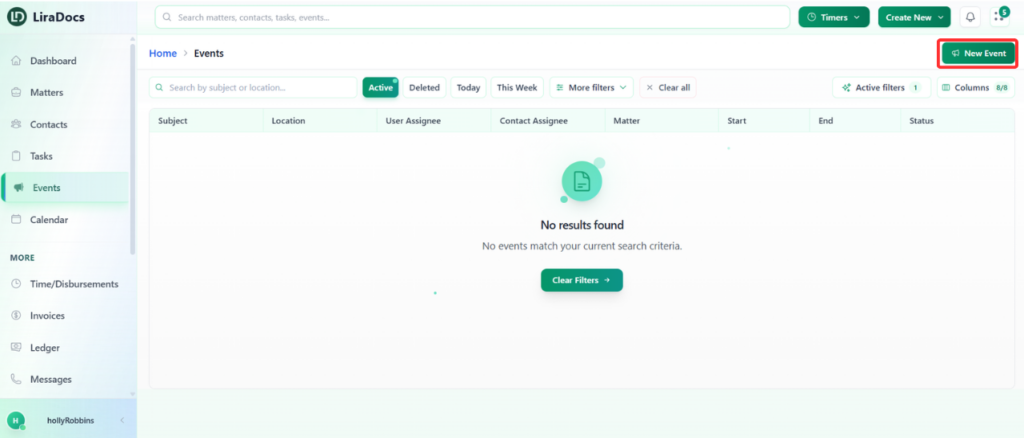
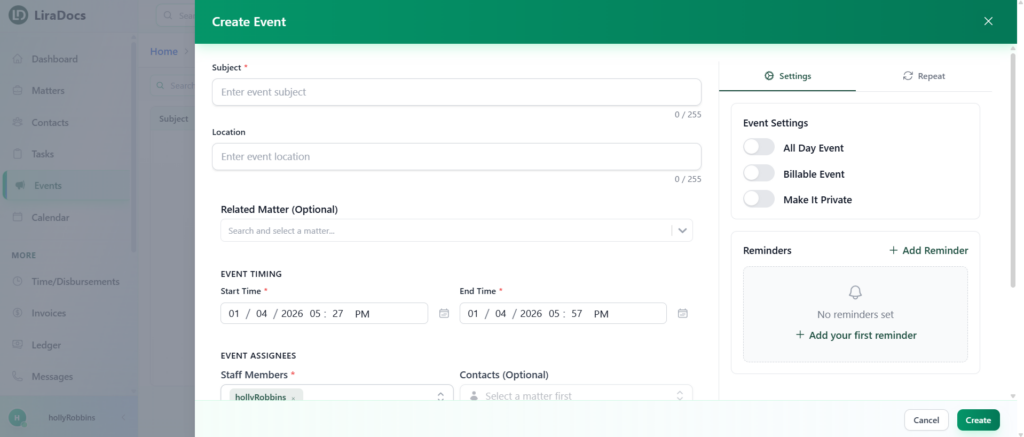
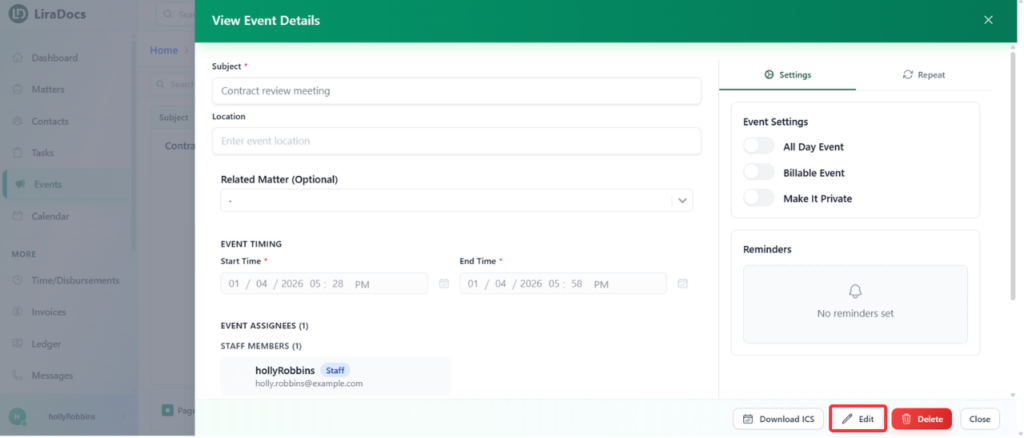
How to Create an Event
How to Create a Time/Fee Entry in Liradocs Mobile App
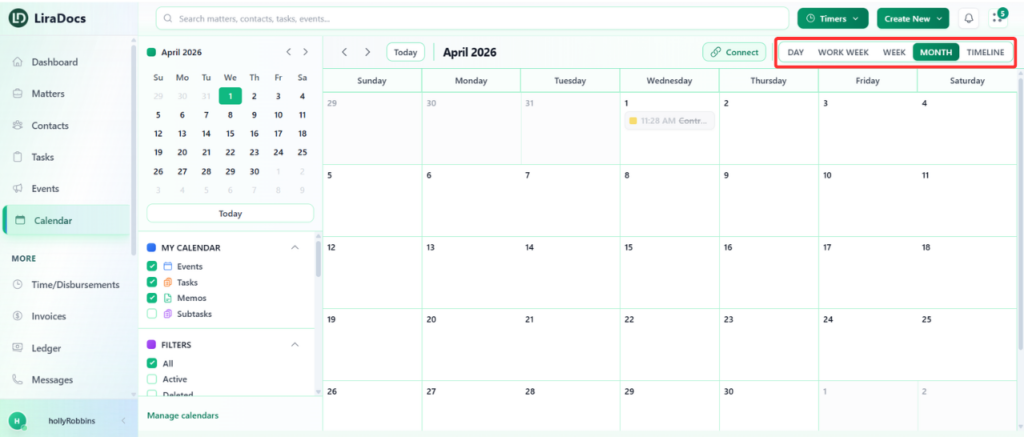
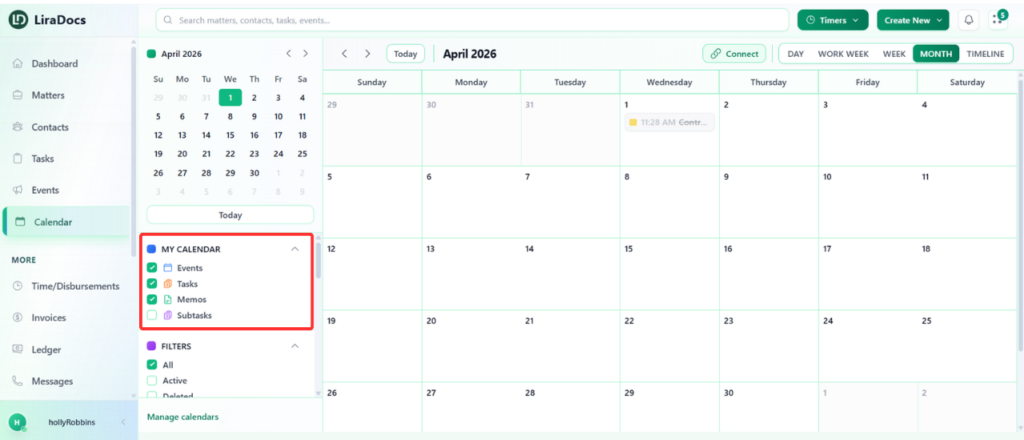
How to Use the Calendar
How to Create a Disbursement Entry in Liradocs Mobile App
How to Create a Time Fee Activity
How to Create a Memo in Liradocs Mobile App
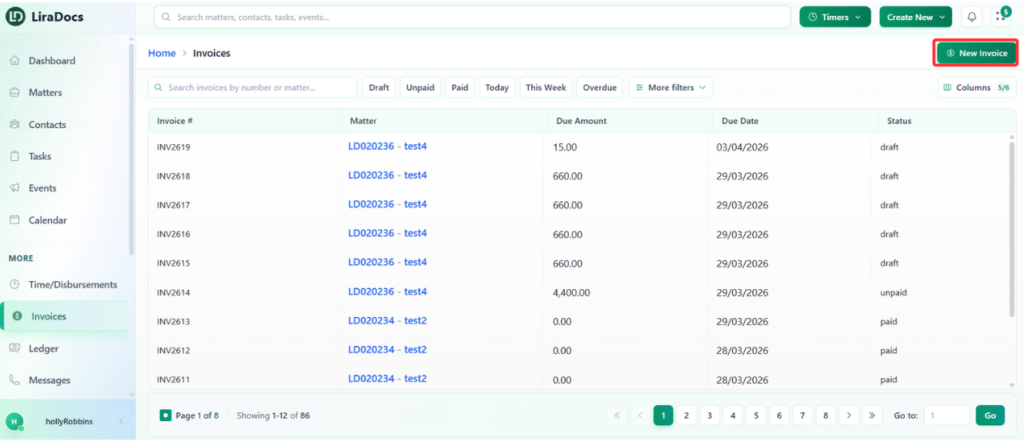
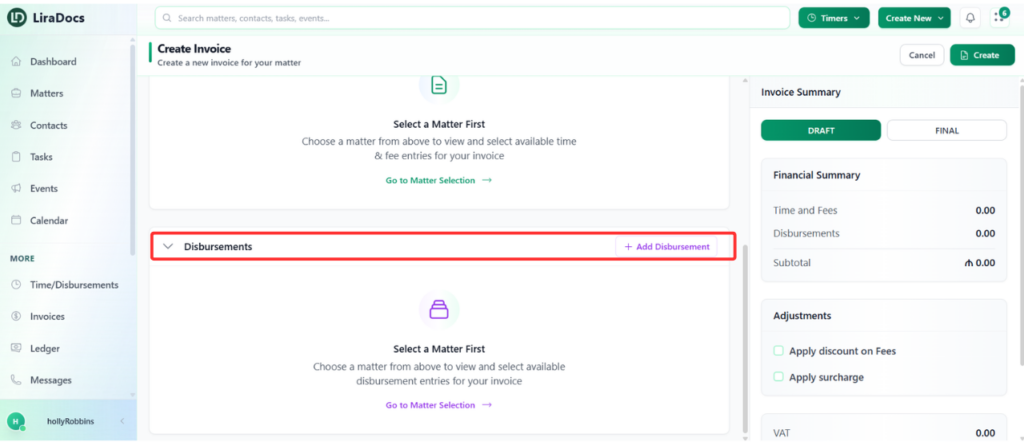
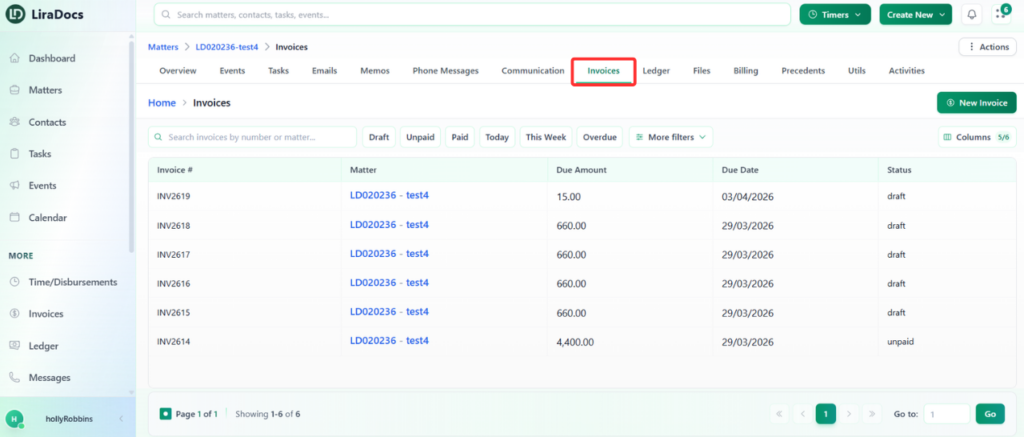
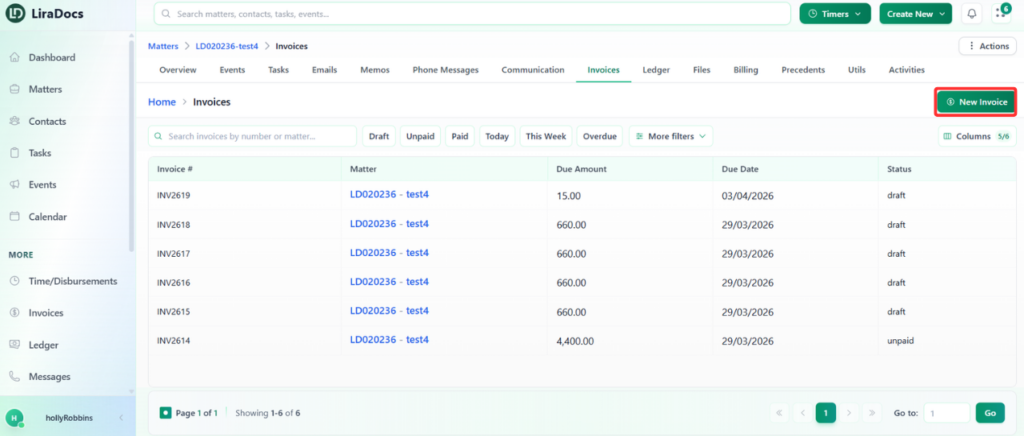
How to Create an Invoice
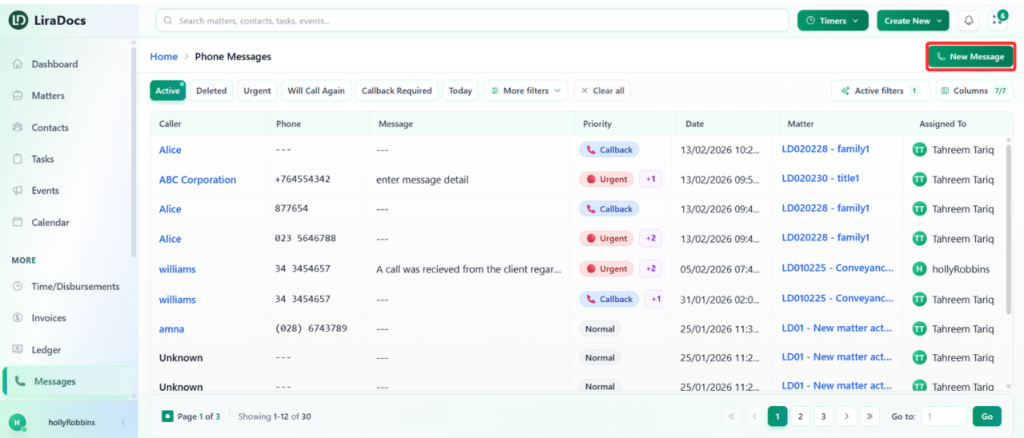
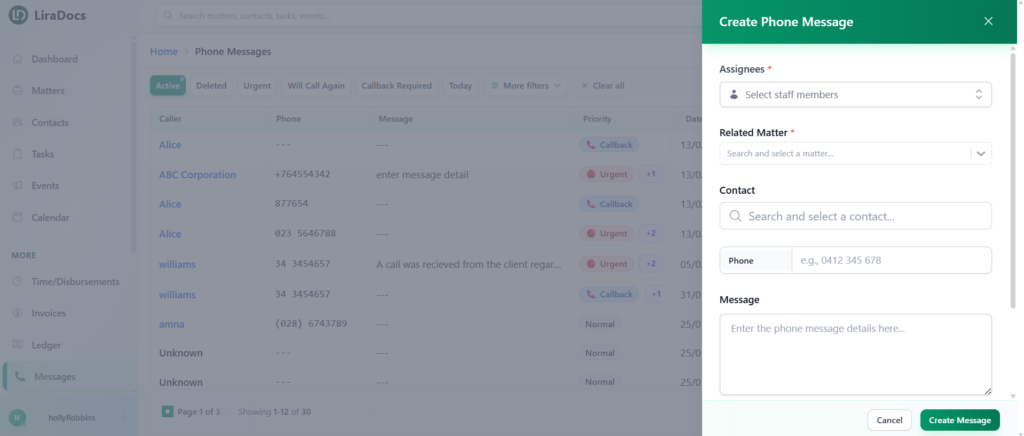
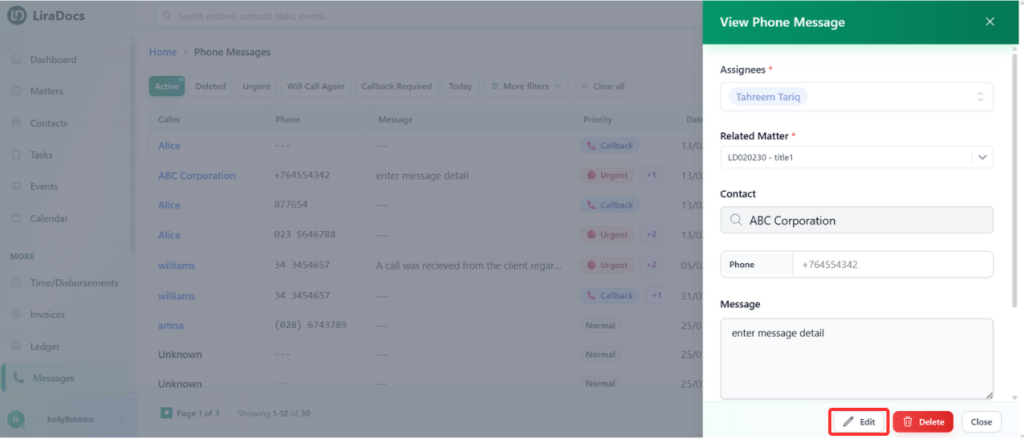
How to Create a New Phone Message
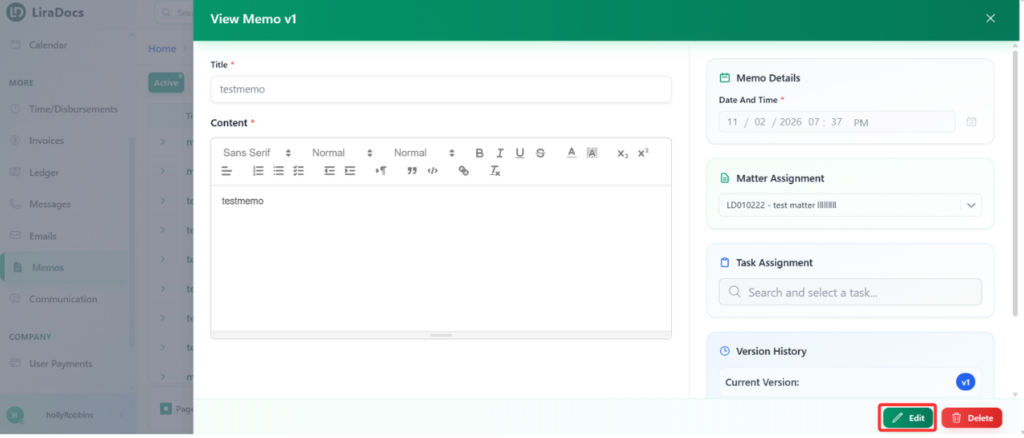
How to Edit a Memo
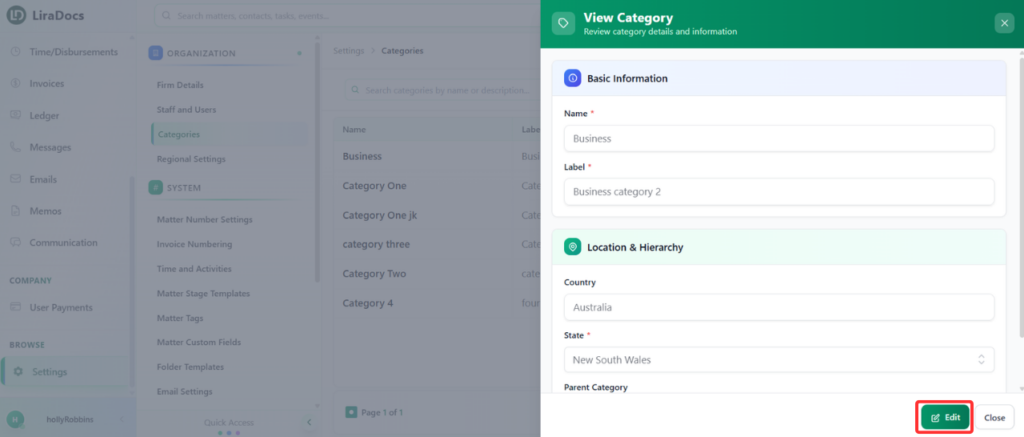
How to Edit a Matter Category
How to Reinstate a Deleted Matter in Liradocs Mobile App
Matters
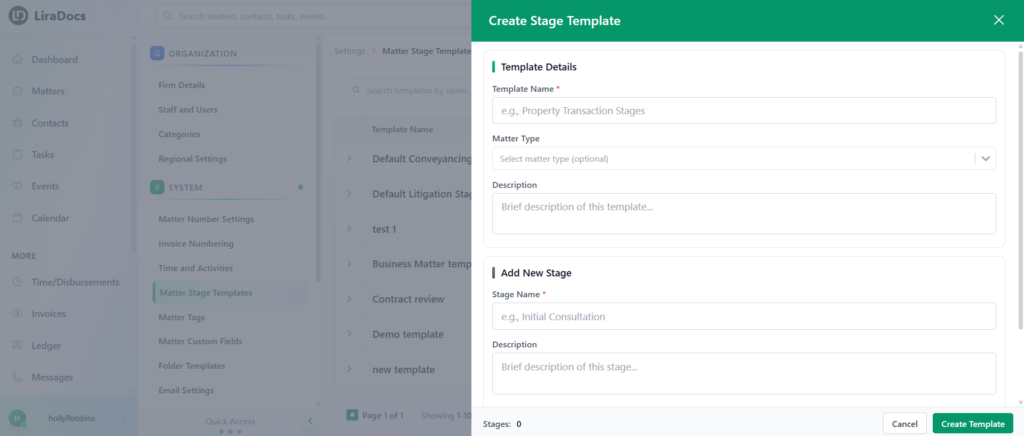
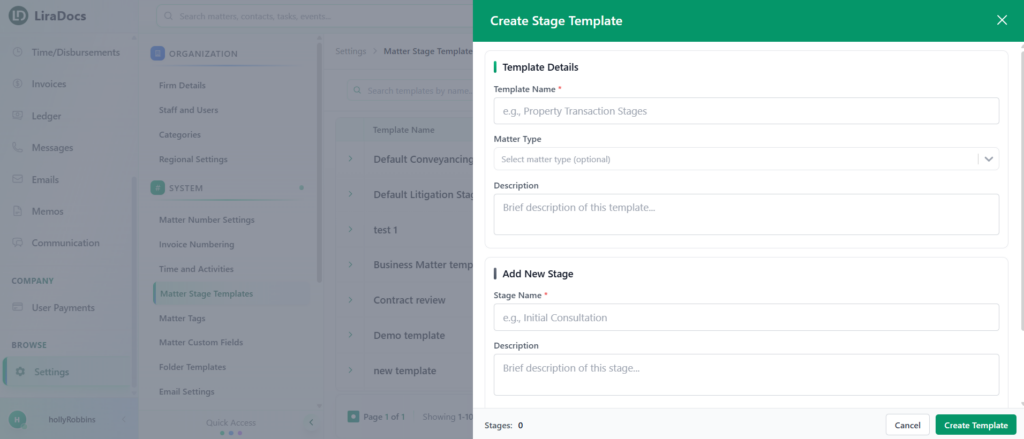
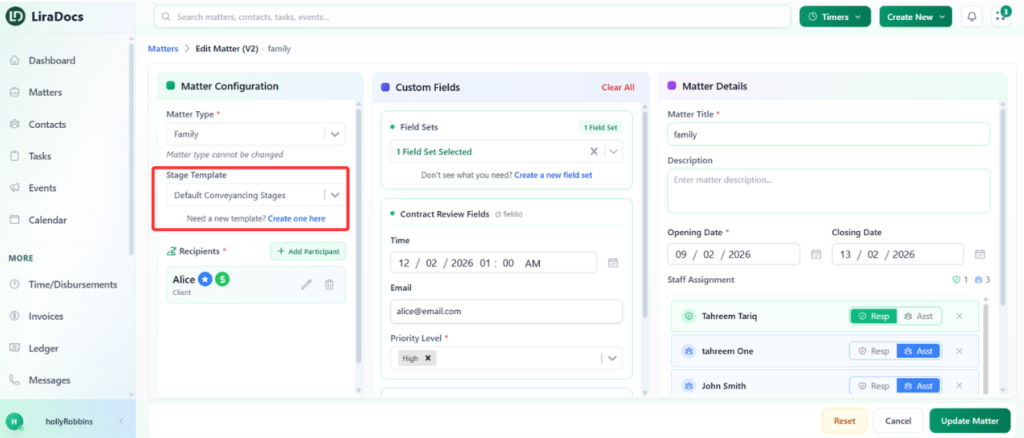
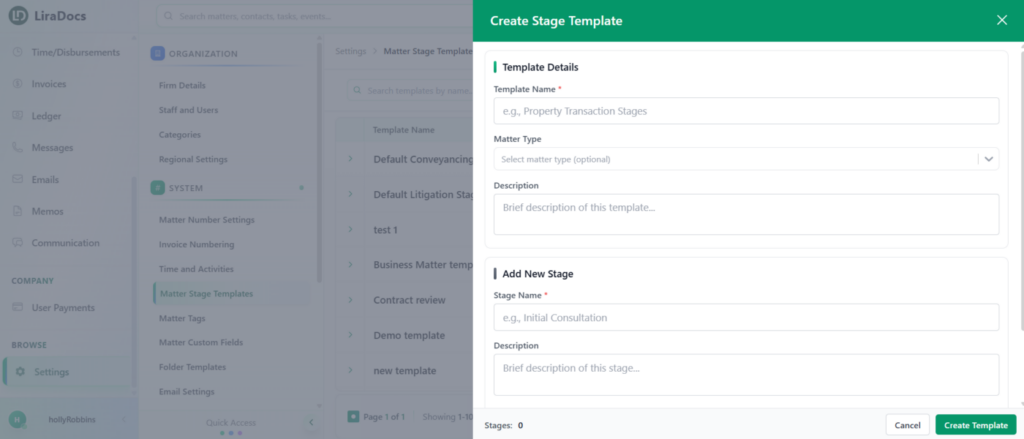
How To Create And Assign A Stage Template
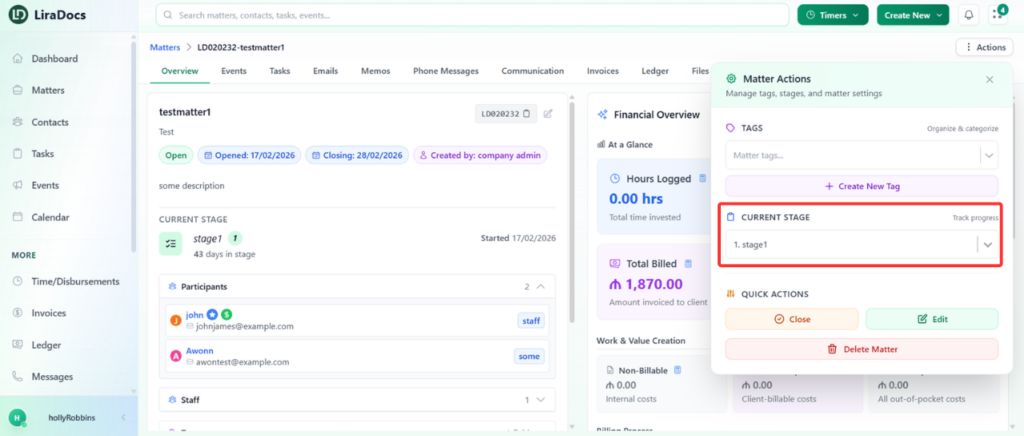
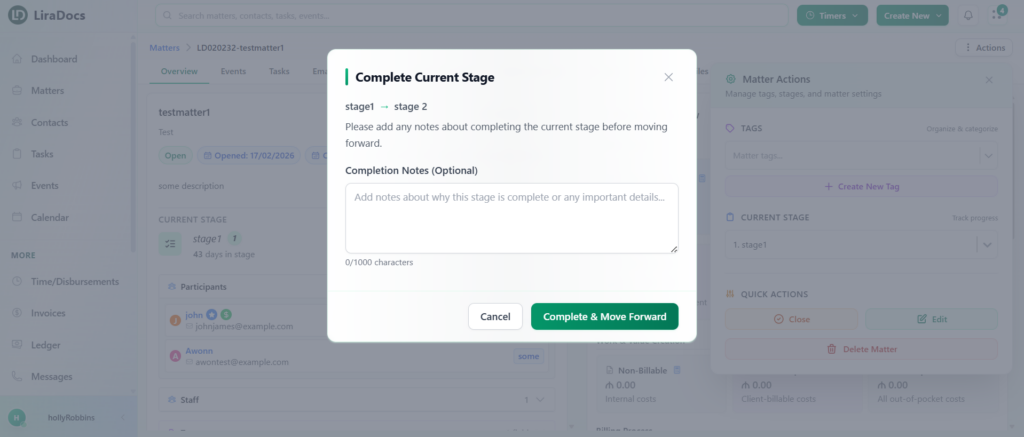
How To Change The Stage Level Of A Matter
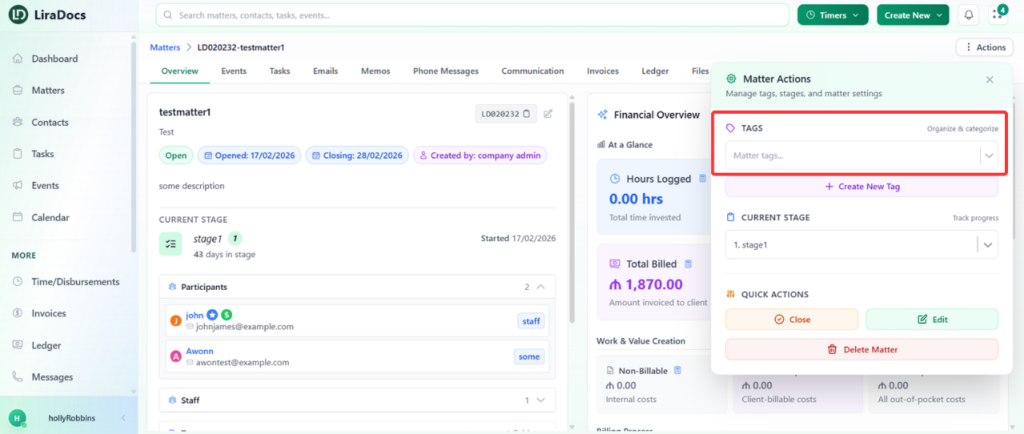
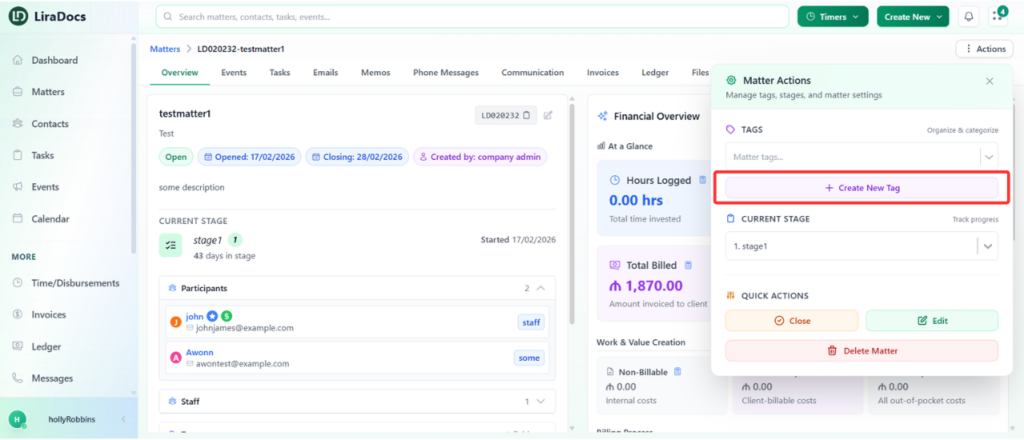
How To Assign A Tag To A Matter
How To Remove An Assigned Tag From A Matter
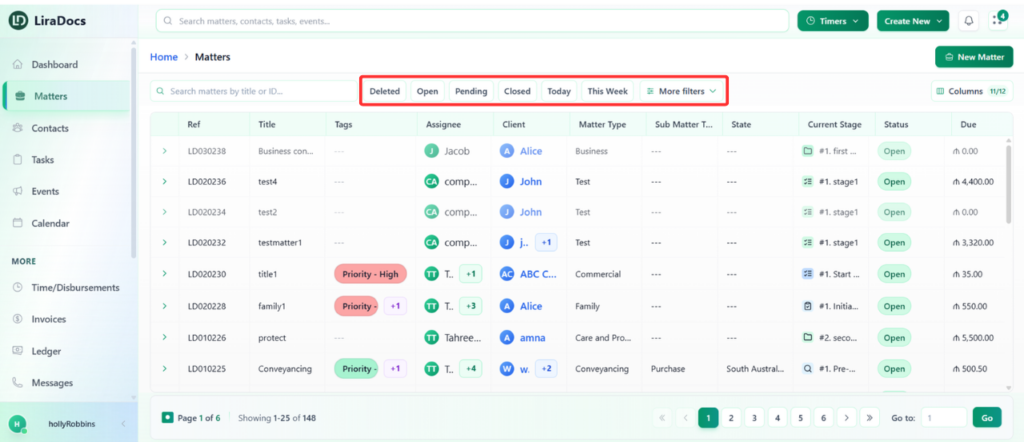
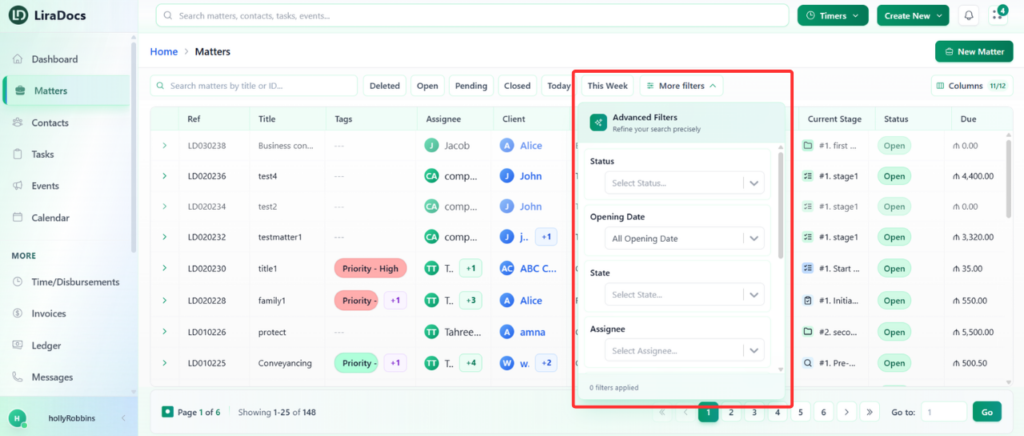
How To Apply Filters To View Specific Matters
How to Create Matter Categories
How to Edit a Matter Category
Contacts
How to Create an Individual Contact in Liradocs Mobile App
How to Create an Organizational Contact in Liradocs Mobile App
How to Edit a Contact in Liradocs Mobile App
How to Delete a Contact in Liradocs Mobile App
How to Restore a Deleted Contact in Liradocs Mobile App
How to Create a Time Activity
How to Create an Organizational Contact in Liradocs Mobile App
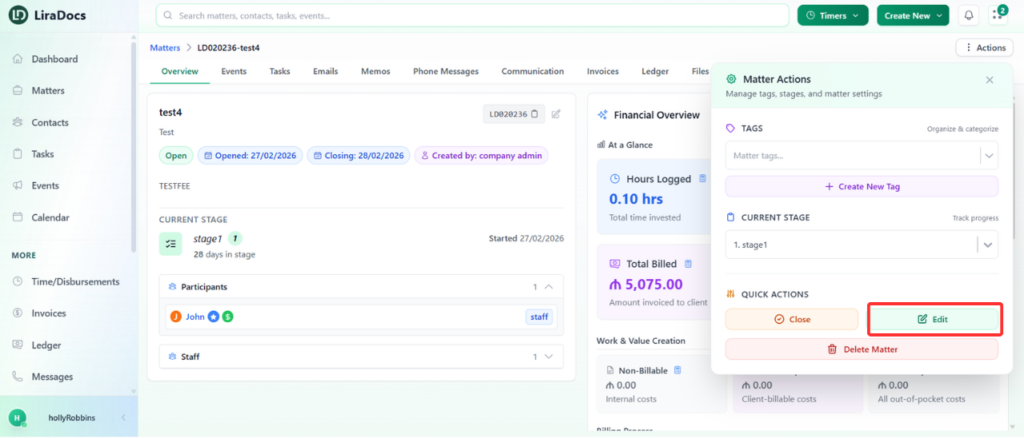
How To Edit A Matter
Matter Categories
How to Create a Matter Category
How to Edit a Matter Category
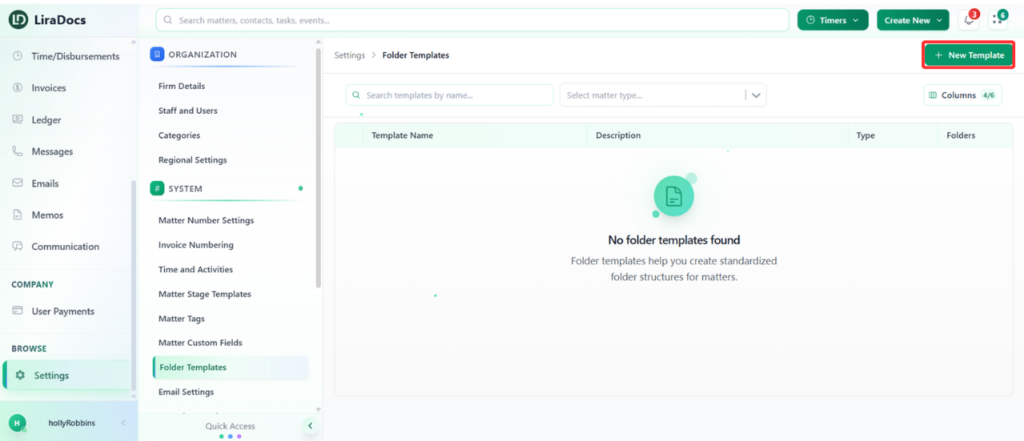
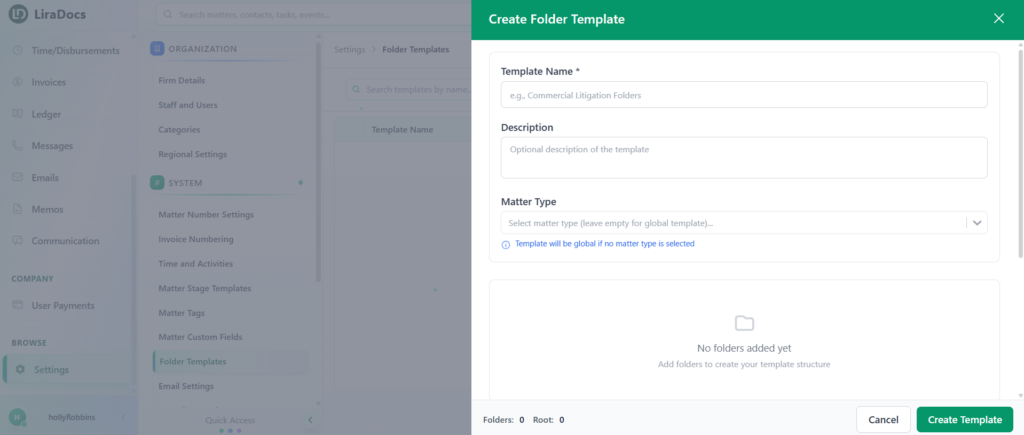
How to Create a Folder Template
How to Edit an Event in Liradocs Mobile App
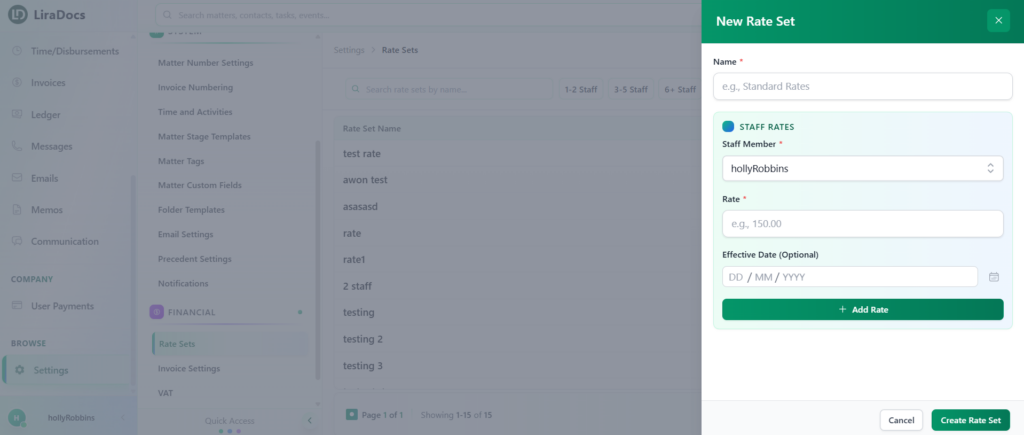
How to Create a Rate Set
How to Edit a Task in Liradocs Mobile App
How to Create an Organizational Contact
How to Edit a Phone Message in Liradocs Mobile App
How to Edit a Task
How to Add a New Widget to the Dashboard
How to Edit an Event
How to Edit a Time/Fee Entry in Liradocs Mobile App
How to Edit a Disbursement Entry in Liradocs Mobile App
How to Create a Time Activity
How to Edit a Memo in Liradocs Mobile App
How to Edit an Existing Phone Message
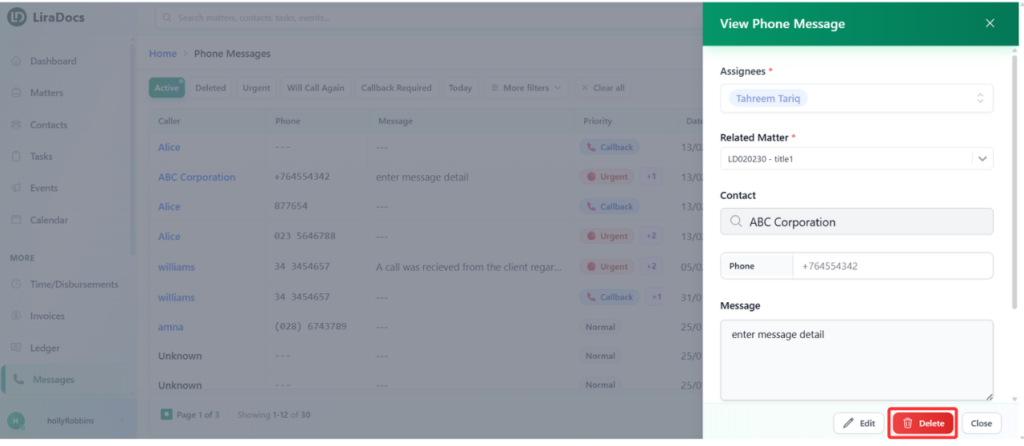
How to Delete a Phone Message
How to Delete a Memo
How to Delete a Task in Liradocs Mobile App
Liradocs Mobile App
How to Create a Matter in Liradocs Mobile App
How to Reinstate a Deleted Matter in Liradocs Mobile App
How to Create an Individual Contact in Liradocs Mobile App
How to Create an Organizational Contact in Liradocs Mobile App
How to Edit a Contact in Liradocs Mobile App
How to Delete a Contact in Liradocs Mobile App
How to Restore a Deleted Contact in Liradocs Mobile App
How to Create an Event in Liradocs Mobile App
How to Edit an Event in Liradocs Mobile App
How to Delete an Event in Liradocs Mobile App
How to Restore a Deleted Event in Liradocs Mobile App
How to Use Calendar in Liradocs Mobile App
How to Create a Task in Liradocs Mobile App
How to Edit a Task in Liradocs Mobile App
How to Delete a Task in Liradocs Mobile App
How to Restore a Deleted Task in Liradocs Mobile App
How to Create a New Phone Message in Liradocs Mobile App
How to Edit a Phone Message in Liradocs Mobile App
How to Delete a Phone Message in Liradocs Mobile App
How to Reinstate a Deleted Phone Message in Liradocs Mobile App
How to View and Delete an Email in Liradocs Mobile App
How to Create a Time/Fee Entry in Liradocs Mobile App
How to Edit a Time/Fee Entry in Liradocs Mobile App
How to Delete a Time/Fee Entry in Liradocs
How to Create a Disbursement Entry in Liradocs Mobile App
How to Edit a Disbursement Entry in Liradocs Mobile App
How to Delete a Disbursement Entry in Liradocs Mobile App
How to Create a Memo in Liradocs Mobile App
How to Edit a Memo in Liradocs Mobile App
How to Delete a Memo in Liradocs Mobile App
How to Reinstate a Deleted Memo in Liradocs Mobile App
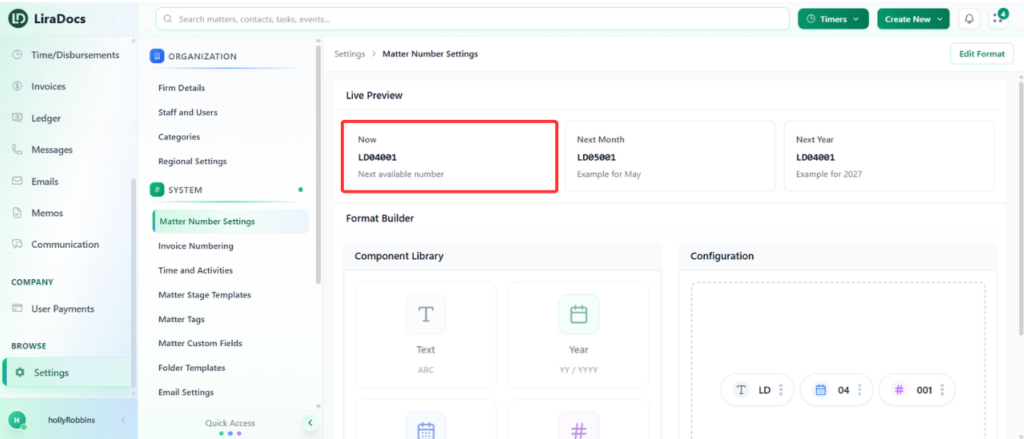
Matter Number Settings
How to Create a Disbursement Activity
How to Edit a Contact in Liradocs Mobile App
How To Create And Assign A Stage Template
Events
How to Create an Event in Liradocs Mobile App
How to Edit an Event in Liradocs Mobile App
How to Delete an Event in Liradocs Mobile App
How to Restore a Deleted Event in Liradocs Mobile App
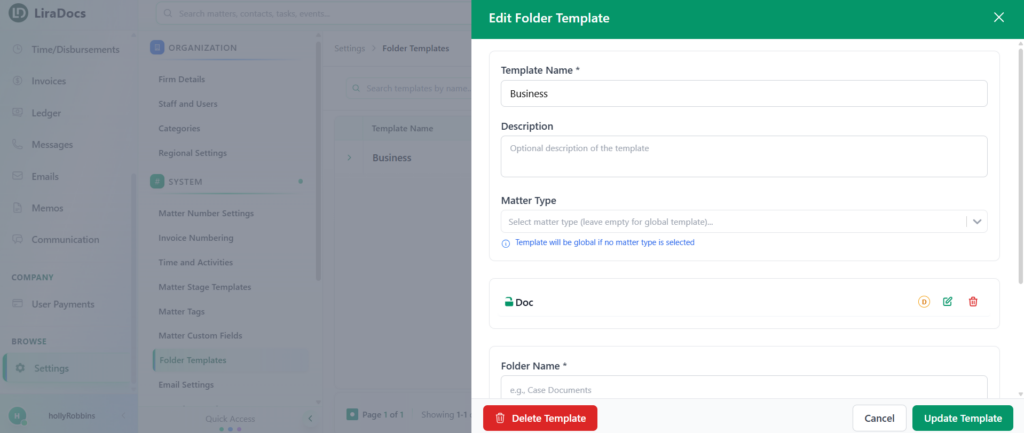
How to Edit a Folder Template
How to Delete an Event in Liradocs Mobile App
Contacts
Understanding Contacts in Liradocs
In Liradocs, Contacts represent the people or organizations that your firm interacts with while managing matters. Contacts help you store and organize important details such as names, phone numbers, email addresses, and other relevant information.
By keeping contact information organized within the system, Liradocs makes it easier to quickly find and communicate with clients, colleagues, and other associated parties.
Types of Contacts
Liradocs allows you to create and manage two main types of contacts:
Individual Contacts
These represent a single person, such as a client, witness, consultant, or staff member.
Organizational Contacts
These represent companies, firms, or institutions that your firm may interact with during a matter.
Both types of contacts allow you to store detailed information so your team always has access to accurate contact records.
Why Contacts Are Important
Managing contacts within Liradocs helps keep your firm’s communication and client information organized. Instead of searching through emails or external records, all contact details are stored in one centralized location.
Using contacts in Liradocs helps your team:
Maintain a structured client database
Quickly search and access contact details
Link contacts to specific matters
Track communication with clients and organizations
Keep contact records organized and up to date
Learn How to Manage Contacts
In the guides within this section, you will learn how to fully manage contacts in Liradocs, including:
Creating new contacts
Editing existing contact details
Deleting contacts when necessary
Using filters and search to find contacts quickly
Select a guide below to learn more about each feature.
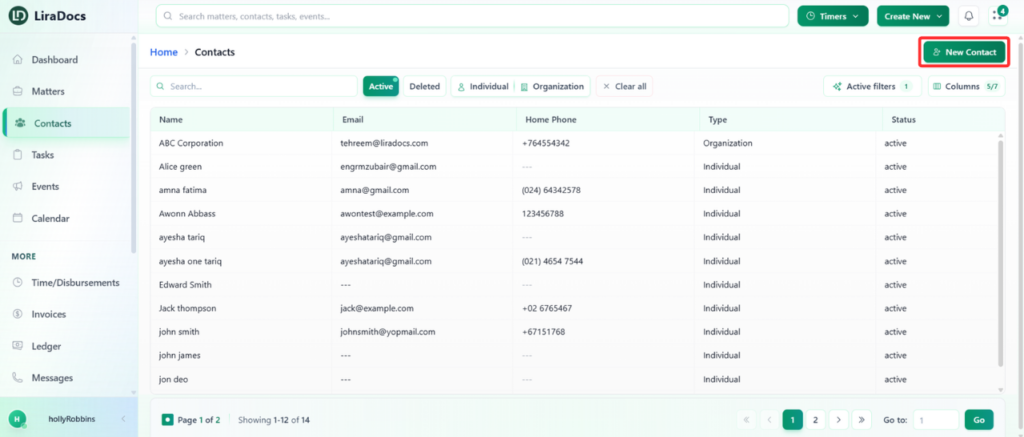
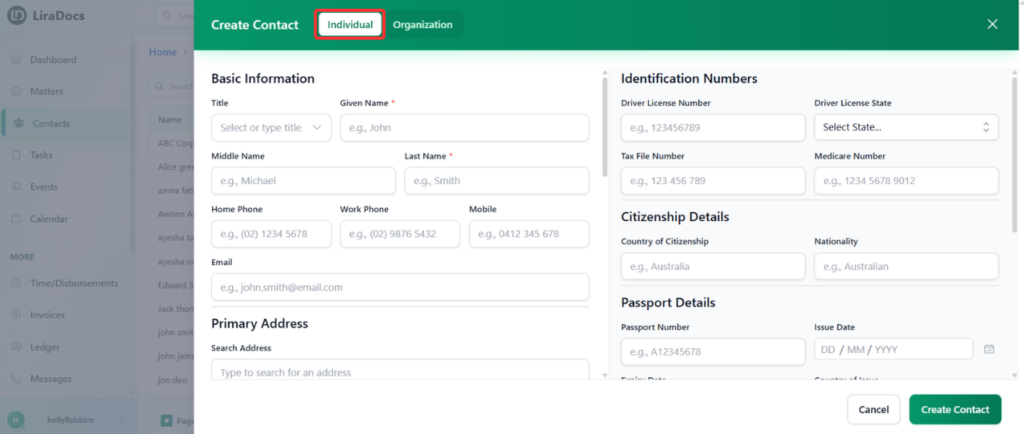
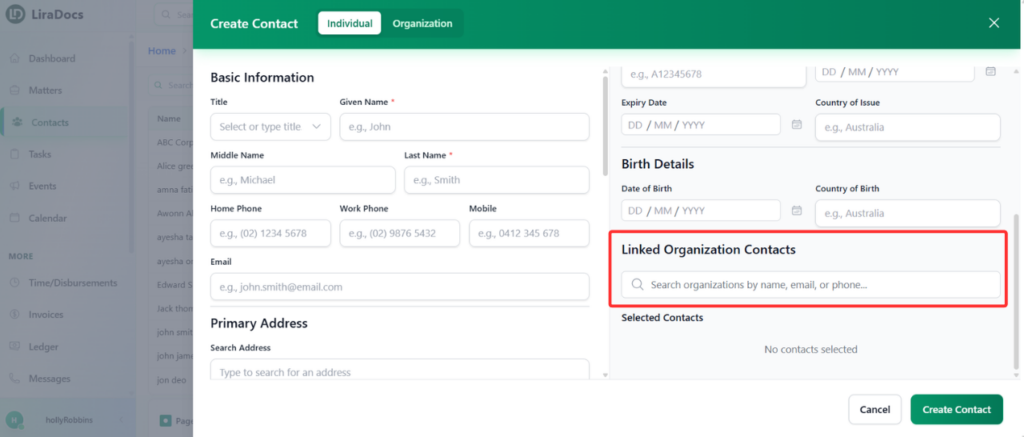
How to Create an Individual Contact
How to Create an Organizational Contact
How to Use Filters in Contacts
How to Edit a Rate Set
How to Delete a Phone Message in Liradocs Mobile App
How to Edit a Contact
How to Delete a Task
How to Edit a Dashboard Widget
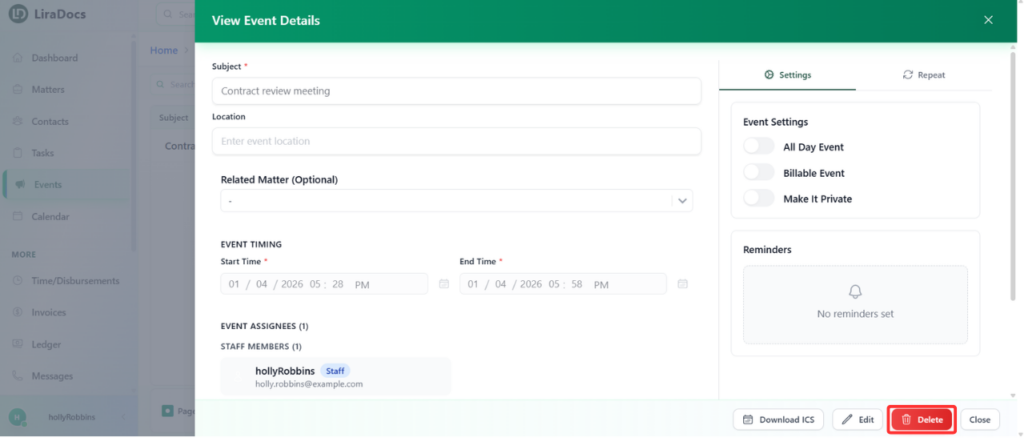
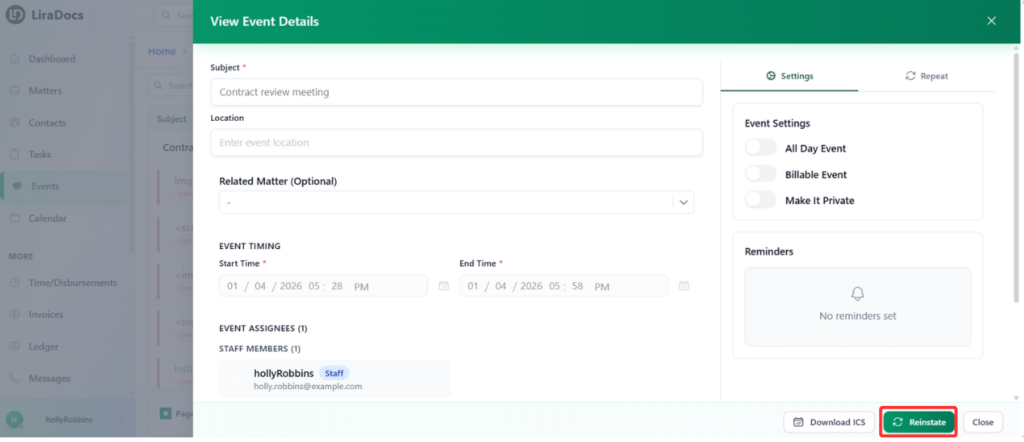
How to Delete an Event
How to Delete a Time/Fee Entry in Liradocs
How to Delete a Disbursement Entry in Liradocs Mobile App
How to Create a Disbursement Activity
How to Delete a Memo in Liradocs Mobile App
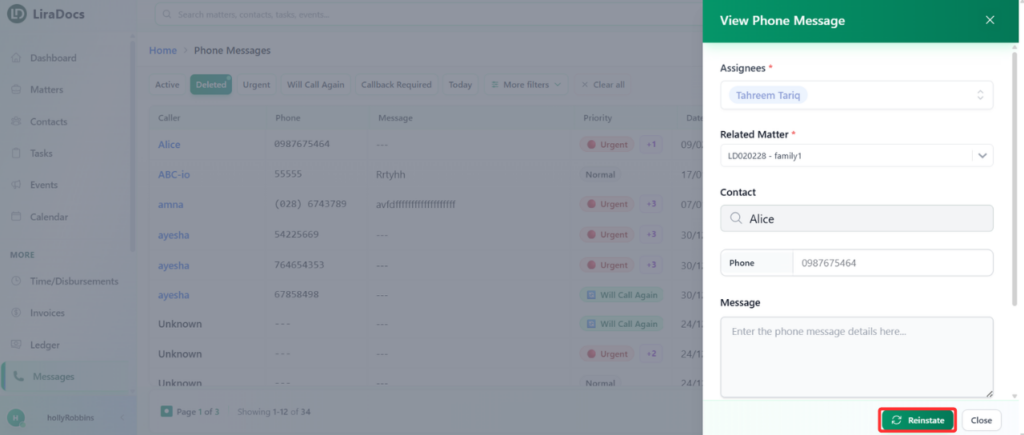
How to Reinstate a Deleted Message
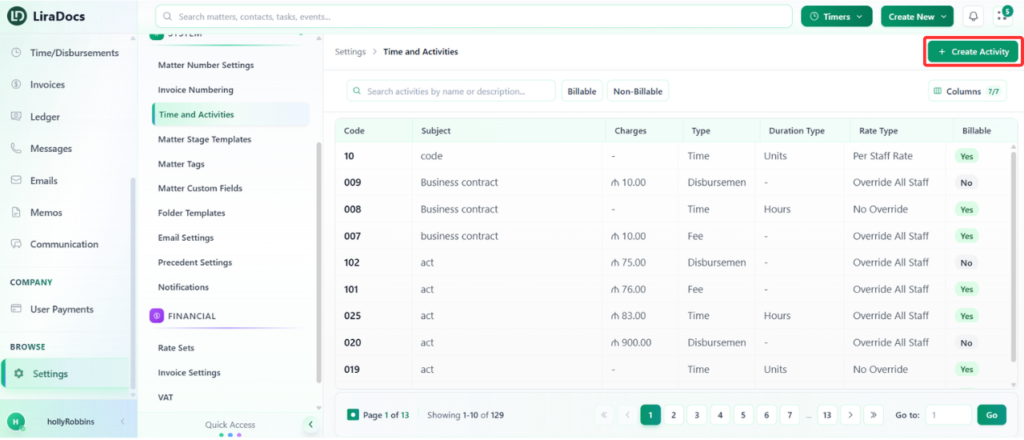
Time and Activities
How to Create a Time Fee Activity
How to Create a Time Activity
How to Create a Disbursement Activity
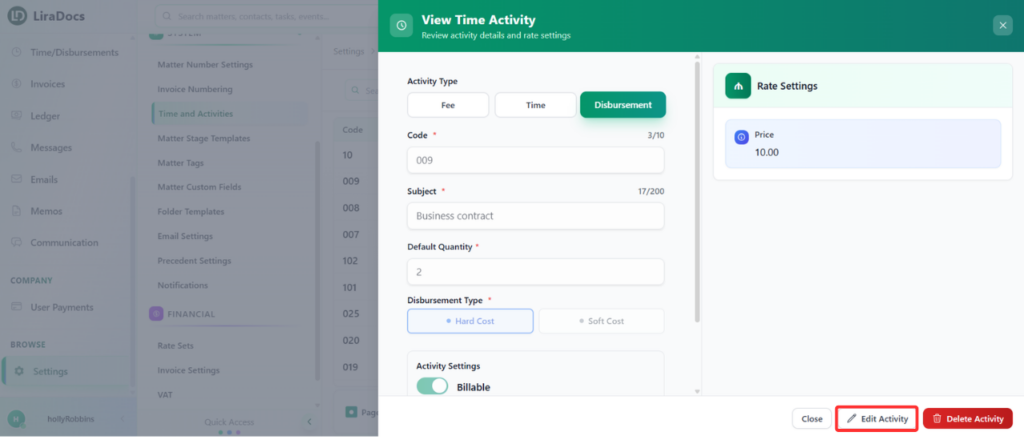
How to Edit a Time Fee Activity
How to Edit a Time Fee Activity
How to Delete a Contact in Liradocs Mobile App
How To Change The Stage Level Of A Matter
How to Delete a Folder Template
How to Restore a Deleted Event in Liradocs Mobile App
How to Use Calendar in Liradocs Mobile App
How to Restore a Deleted Task in Liradocs Mobile App
How to Reinstate a Deleted Phone Message in Liradocs Mobile App
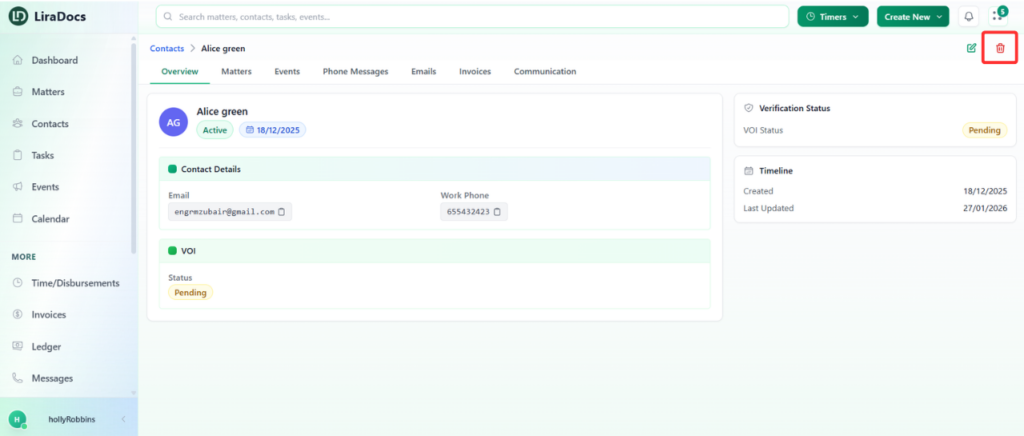
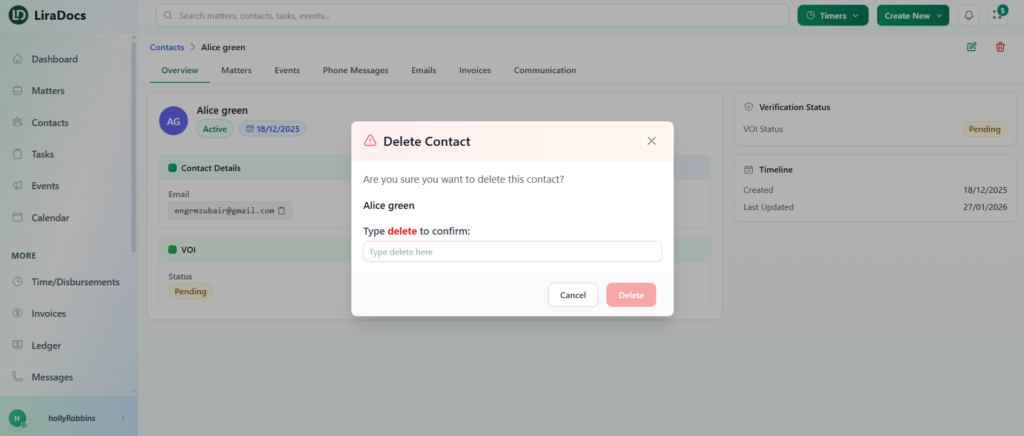
How to Delete a Contact
Tasks
How to Restore a Deleted Task
How to Restore a Deleted Task
How to Restore a Deleted Event
How to Edit a Time Fee Activity
How to Reinstate a Deleted Memo in Liradocs Mobile App
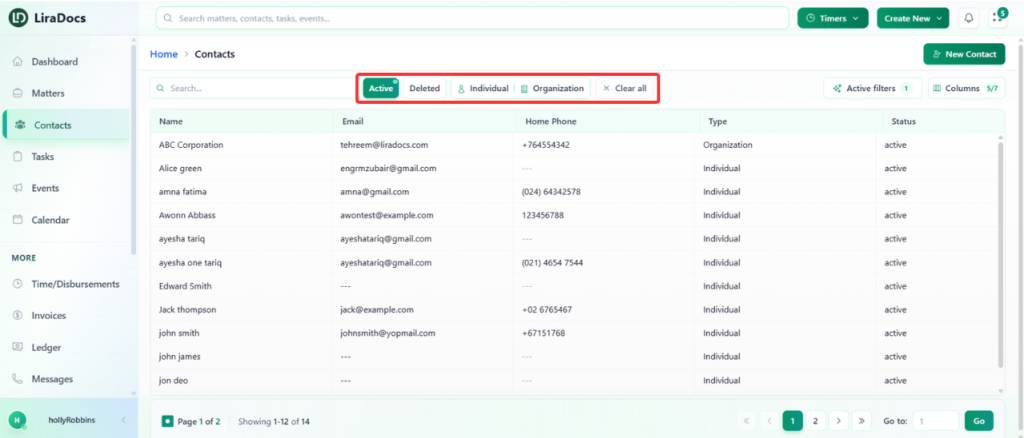
How to Use Filters in Contacts
How to Delete a Dashboard Widget
How To Create A Stage Template
How to Restore a Deleted Contact in Liradocs Mobile App
How To Assign A Tag To A Matter
Tasks
How to Create a Task in Liradocs Mobile App
How to Edit a Task in Liradocs Mobile App
How to Delete a Task in Liradocs Mobile App
How to Restore a Deleted Task in Liradocs Mobile App
Events
How to Restore a Deleted Event
How To Remove An Assigned Tag From A Matter
Messages
How to Create a New Phone Message in Liradocs Mobile App
How to Edit a Phone Message in Liradocs Mobile App
How to Delete a Phone Message in Liradocs Mobile App
How to Reinstate a Deleted Phone Message in Liradocs Mobile App
Liradocs Desktop App
Dashboard – Complete Guide
Adding and Customizing Widgets
Editing or Deleting a Widget
How to Add a New Widget to the Dashboard
How to Edit a Dashboard Widget
How to Delete a Dashboard Widget
How To Create And Assign A Stage Template
How To Change The Stage Level Of A Matter
How To Assign A Tag To A Matter
How To Remove An Assigned Tag From A Matter
How To Apply Filters To View Specific Matters
How to Create Matter Categories
How to Edit a Matter Category
Contacts
Understanding Contacts in Liradocs
In Liradocs, Contacts represent the people or organizations that your firm interacts with while managing matters. Contacts help you store and organize important details such as names, phone numbers, email addresses, and other relevant information.
By keeping contact information organized within the system, Liradocs makes it easier to quickly find and communicate with clients, colleagues, and other associated parties.
Types of Contacts
Liradocs allows you to create and manage two main types of contacts:
Individual Contacts
These represent a single person, such as a client, witness, consultant, or staff member.
Organizational Contacts
These represent companies, firms, or institutions that your firm may interact with during a matter.
Both types of contacts allow you to store detailed information so your team always has access to accurate contact records.
Why Contacts Are Important
Managing contacts within Liradocs helps keep your firm’s communication and client information organized. Instead of searching through emails or external records, all contact details are stored in one centralized location.
Using contacts in Liradocs helps your team:
Maintain a structured client database
Quickly search and access contact details
Link contacts to specific matters
Track communication with clients and organizations
Keep contact records organized and up to date
Learn How to Manage Contacts
In the guides within this section, you will learn how to fully manage contacts in Liradocs, including:
Creating new contacts
Editing existing contact details
Deleting contacts when necessary
Using filters and search to find contacts quickly
Select a guide below to learn more about each feature.
How to Create an Individual Contact
How to Create an Organizational Contact
How to Use Filters in Contacts
How to Restore a Deleted Task
How to Restore a Deleted Event
Time/Disbursements
Understanding Time & Disbursements in Liradocs
The Time & Disbursements feature in Liradocs helps your firm accurately record billable work and track expenses related to matters. It allows staff members to log the time they spend working on different tasks and also record any additional costs incurred during the course of a matter.
By capturing both time entries and disbursements in one place, Liradocs makes it easier to manage billing, maintain transparency, and ensure that all work and expenses are properly documented.
What Are Time Entries?
Time entries are used to record the amount of time spent working on a specific matter. Staff members can log their hours for tasks such as meetings, research, drafting documents, or client communication.
Tracking time helps firms measure productivity and ensures that all billable work is properly recorded for invoicing.
What Are Disbursements?
Disbursements refer to expenses incurred while handling a matter. These can include costs such as filing fees, travel expenses, courier charges, or any other out-of-pocket expenses related to a case.
Recording disbursements helps ensure that these costs are properly tracked and can be included in client billing when necessary.
Why Time & Disbursements Are Important
Managing time and expenses effectively is essential for accurate billing and financial tracking. Liradocs simplifies this process by allowing your team to record both time and expenses directly within the system.
Using this feature helps your firm:
Track billable hours accurately
Record matter-related expenses
Maintain detailed billing records
Improve transparency in client invoicing
Monitor productivity and work allocation
Learn How to Manage Time & Disbursements
In the guides within this section, you will learn how to manage time and disbursements in Liradocs, including:
Select a guide below to learn more about each feature.
How to Create a Time Fee Activity
How to Create a Time Activity
How to Create a Disbursement Activity
How to Edit a Time Fee Activity
How to Create a New Phone Message
How to Edit an Existing Phone Message
How to Delete a Phone Message
How to Reinstate a Deleted Message
How to Create a Matter Category
How to Edit a Matter Category
How to Create a Time Fee Activity
How to Create a Time Activity
How to Create a Disbursement Activity
How to Edit a Time Fee Activity
How To Create A Stage Template
How to Create a Folder Template
How to Edit a Folder Template
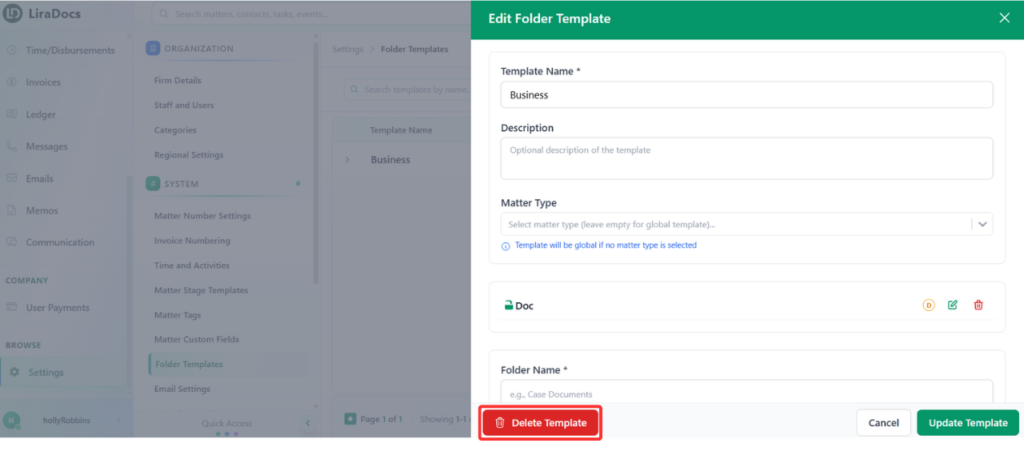
How to Delete a Folder Template
Calendar
Folder Templates
How to Create a Folder Template
How to Edit a Folder Template
How to Delete a Folder Template
How To Apply Filters To View Specific Matters
How to View and Delete an Email in Liradocs Mobile App
Time/Disbursements
Understanding Time & Disbursements in Liradocs
The Time & Disbursements feature in Liradocs helps your firm accurately record billable work and track expenses related to matters. It allows staff members to log the time they spend working on different tasks and also record any additional costs incurred during the course of a matter.
By capturing both time entries and disbursements in one place, Liradocs makes it easier to manage billing, maintain transparency, and ensure that all work and expenses are properly documented.
What Are Time Entries?
Time entries are used to record the amount of time spent working on a specific matter. Staff members can log their hours for tasks such as meetings, research, drafting documents, or client communication.
Tracking time helps firms measure productivity and ensures that all billable work is properly recorded for invoicing.
What Are Disbursements?
Disbursements refer to expenses incurred while handling a matter. These can include costs such as filing fees, travel expenses, courier charges, or any other out-of-pocket expenses related to a case.
Recording disbursements helps ensure that these costs are properly tracked and can be included in client billing when necessary.
Why Time & Disbursements Are Important
Managing time and expenses effectively is essential for accurate billing and financial tracking. Liradocs simplifies this process by allowing your team to record both time and expenses directly within the system.
Using this feature helps your firm:
Track billable hours accurately
Record matter-related expenses
Maintain detailed billing records
Improve transparency in client invoicing
Monitor productivity and work allocation
Learn How to Manage Time & Disbursements
In the guides within this section, you will learn how to manage time and disbursements in Liradocs, including:
Select a guide below to learn more about each feature.
How to Create a Time Fee Activity
How to Create a Time Activity
How to Create a Disbursement Activity
How to Edit a Time Fee Activity
Rate Sets
How to Create Matter Categories
Time/Fee
How to Create a Time/Fee Entry in Liradocs Mobile App
How to Edit a Time/Fee Entry in Liradocs Mobile App
How to Delete a Time/Fee Entry in Liradocs
Invoices
How to Edit a Matter Category
Disbursements
How to Create a Disbursement Entry in Liradocs Mobile App
How to Edit a Disbursement Entry in Liradocs Mobile App
How to Delete a Disbursement Entry in Liradocs Mobile App
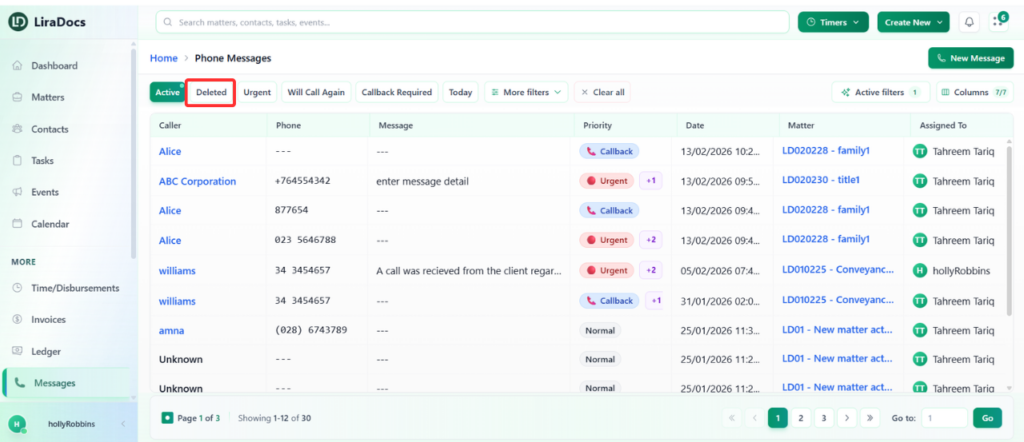
Messages
How to Create a New Phone Message
How to Edit an Existing Phone Message
How to Delete a Phone Message
How to Reinstate a Deleted Message
Memos
Matter Number Settings
Memos
How to Create a Memo in Liradocs Mobile App
How to Edit a Memo in Liradocs Mobile App
How to Delete a Memo in Liradocs Mobile App
How to Reinstate a Deleted Memo in Liradocs Mobile App
Settings
How to Create a Matter Category
How to Edit a Matter Category
How to Create a Time Fee Activity
How to Create a Time Activity
How to Create a Disbursement Activity
How to Edit a Time Fee Activity
How To Create A Stage Template
How to Create a Folder Template
How to Edit a Folder Template
How to Delete a Folder Template
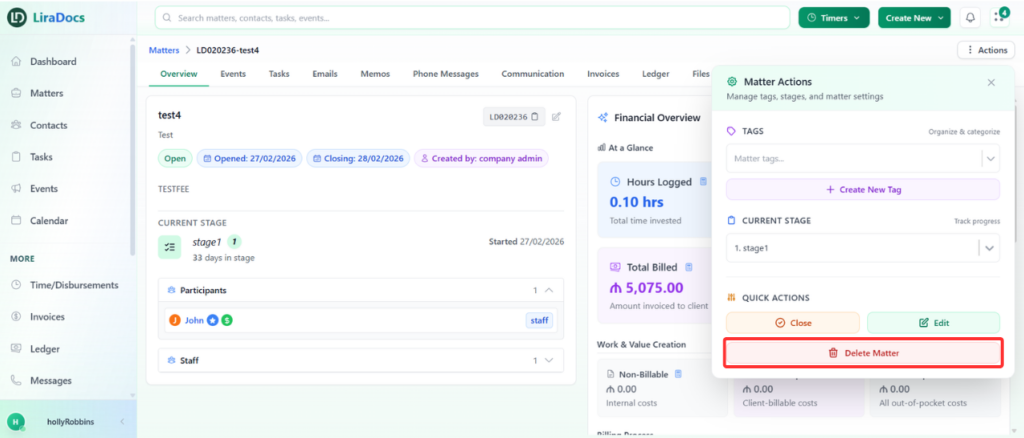
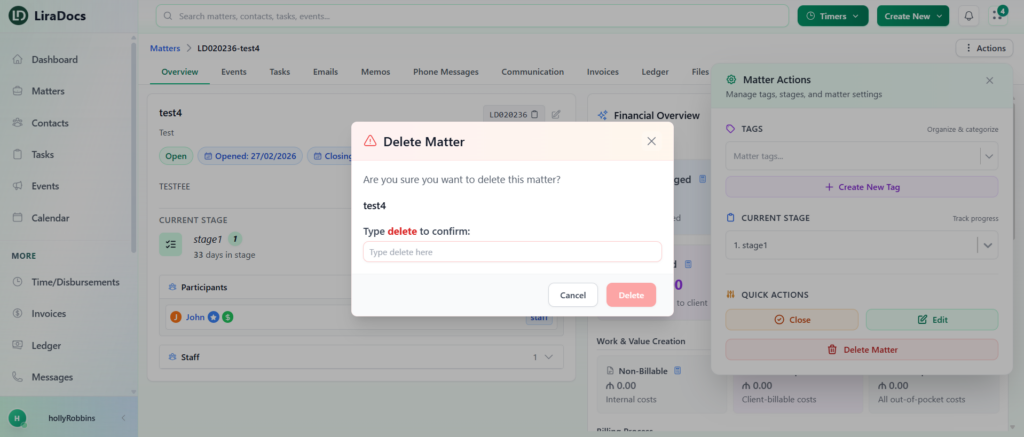
How To Delete A Matter